Before Purchase – Data Plan Questions
What is an eSIM?
An eSIM is a digital SIM that you can apply for online through the eSIM provider’s website and activate on your smartphone. Unlike a traditional SIM card, which needs to be inserted into a SIM slot on the side of the smartphone, a digital SIM is embedded directly into the smartphone and doesn’t require a physical card.
Do you charge a contract processing fee for eSIM?
No, we do not charge a contract processing fee.
Is there a cancellation fee?
No, there is no cancellation fee.
Does the eSIM have an activation deadline after purchase?
Yes, the eSIM is valid for 60 days after purchase. If not activated within this period, it will be automatically deactivated.
Does it use data roaming?
Some packages offer data roaming to communicate on the local carrier's network.
Is voice calling (phone calling) available?
Our service is data-only, so it does not support voice calls with a phone number. Please use apps like WhatsApp, Skype, or Zoom for calls.
What happens after I use up my data?
For data plans with a fixed allowance, the service will stop once you use up your data, even if it is still within the validity period.
For the Global Plan, even after using up your data, you can still use the service at reduced speeds.
Is hotspot available?
Hotspot is also available.
- iPhone "Mobile Communications" -> "Internet Sharing
- Android "Network and Internet" -> "Access Point and Tethering"
The following APN settings are required for Japan eSIM only.
(APN settings below for eSIM for Japan only)
APN:vmobile.jp
LTE Settings:vmobile.jp
Internet Sharing (Hotspot):vmobile.jp
When does the usage period begin?
The usage period starts when you install the eSIM on your smartphone and connect to the internet at your destination.
Please tell me the standard for one day from the start to the end of the usage period.
With the exception of data plans for "Japan," "India," "South Africa," "33 European countries," "41 European countries," and "the U.S. and Canada," all other data plans are calculated on a 24-hour basis, with each 24-hour period counting as one day. Therefore, if you purchase a data plan with a 3-day validity period and start using it at 3:00 PM on January 1, it will remain available until 2:59 PM on January 4.
Data plans for Japan reset daily at UTC+9 (Japan time 0:00) from the start of usage. For example, a 5-day plan starting at 10:00 AM Japan time on January 1st is valid until 11:59 PM Japan time on January 5th.
Data plans for India are based on a daily cycle: usage resets at UTC+8 (Beijing time 0:00) from the start date. For example, a 5-day plan starting at 10:00 AM on January 1 (Beijing time) will be valid until 11:59 PM on January 5 (Beijing time).
For data plans covering "33 European Countries," "41 European Countries," "the United States and Canada," and "South Africa," the daily usage period resets at UTC+8 (0:00 London time) from the start of service. For example, if you start a 5-day plan at 10:00 AM on January 1 (London time), you can use it until 11:59 PM on January 5 (London time).
Is there any speed reduction on the unlimited data plan?
There are no speed restrictions for regular video streaming or web browsing. However, if you use an exceptionally large amount of data in a short period, the local carrier may temporarily reduce your speed at their discretion.
CAN I USE 5G?
Yes, some packages support both 4G and 5G, while others are limited to 4G only.
Where is the coverage area?
Coverage varies by country, depending on the network provider for each eSIM data plan. Please check the following website for coverage maps of each provider.
https://www.nperf.com/ja/map/JP/-/-/signal?ll=20&lg=0&zoom=3
Can I use LINE and Google in China without a VPN?
In China, you can use LINE, Google, Yahoo! etc. without VPN.
Before Purchase – How to Buy
Which plan should I purchase?
Choose the best plan based on your stay duration and data needs from the available options for your destination. If you're traveling to multiple countries, check whether the plan covers all your destinations.
What is the process from purchase to activation?
1. Check if your phone is compatible with eSIM.
2. Purchase the eSIM data plan of your choice.
3. You will receive an automatic email with a QR code for eSIM.
4. Install the QR code on the phone that will use eSIM by the day before your trip.
5. When you arrive at the location Once there, switch to eSIM mobile data, turn on data roaming, and connect to the Internet.
Can I purchase it from overseas?
Yes, you can purchase it from overseas.
If more than one person is using an eSIM, can one person place more than one order?
There is no problem to order eSIMs for use by more than one person. eSIMs will be delivered one at a time to the e-mail address registered at the time of purchase.
However, please be sure to read and install the QR Code for eSIM on each device to be used. eSIM QR Code cannot be used on any device other than the device that has read it once.
May I purchase one on behalf of a family member?
It is no problem for a proxy to order an eSIM for a family member. eSIMs will be sent to the e-mail address registered at the time of purchase.
However, please be sure to read the QR Code for eSIM and install it on the device of the person who will use the eSIM. eSIM QR Code cannot be used on any device other than the device that has read it once.
Is it available for corporate purchase?
Yes, corporate customers can purchase it.
What payment methods are available?
The official store supports credit card payments.
Frequently asked questions after purchase
I haven't received my eSIM QR code.
eSIM products are sent by e-mail from the delivery-only domain of "delivery-japanconnect-esim@japanconnect-esim.store". If you do not receive the e-mail, please check to see if it has been sorted into your spam mail box.
If you cannot find the email in your inbox or spam folder, please contact our customer support team with your order number if you made a purchase from the official store.
The order number is sent via an automated email after your purchase. If you did not receive it, your registered email address may be incorrect. In that case, please reach out to our customer support team.

Business hours: 9:00~18:00 (Japan time)
Click here if you purchased from the Amazon store.
I made a mistake with my registered e-mail address when I purchased the product.
Please provide us with the following information using the Contact Us form. We will resend the e-mail to the correct e-mail address during business hours (9:00~18:00 Japan time).
- Order number (if available)
- Full name at time of purchase
- Purchase Package (Country/Data Plan/Days)
- Correct email address
In the unlikely event that you need to use your order immediately after business hours, please reorder using the correct email address. If you have ordered the wrong item, please use the Return/Refund Request Form to submit your request.
Where can I check my order details?
For orders purchased after account registration, please log in to My Account at the top right of the page and go to "Orders" to view your orders.
If you purchased from the Amazon store, please check with Amazon.
Where can I find my receipt?
For official store purchases | How to view your receipt
You can print out the eSIM order from the Print: Open print view in browser in the "JapanConnect eSIM Order Completed" email. (You will receive the order completion e-mail a few hours after the eSIM product is issued or on the next business day.)
The first time you place an order, you will receive a "JapanConnect eSIM | JapanConnect eSIM account has been created. You will need to set up a password from the "JapanConnect eSIM Account Created" email that you will receive when you place your order.
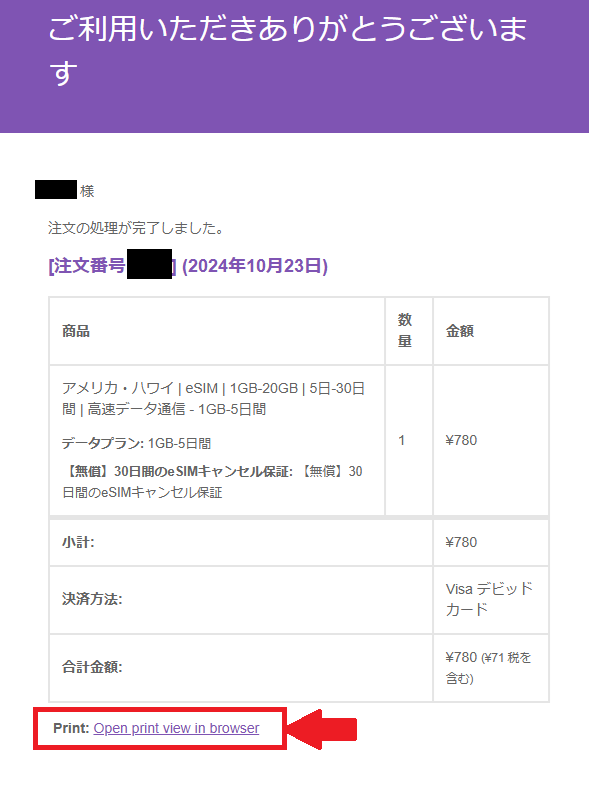
After registering an account and making a purchase, you can print your receipt by logging into 'My Account,' going to 'Orders,' and selecting 'Print.'
If you do not receive a receipt, your credit card statement can be used as an official receipt for tax purposes. Please use it if necessary.
- For Amazon Store purchases | How to check your receipt -
If you purchased from the Amazon store, please check your order history in your Amazon account.
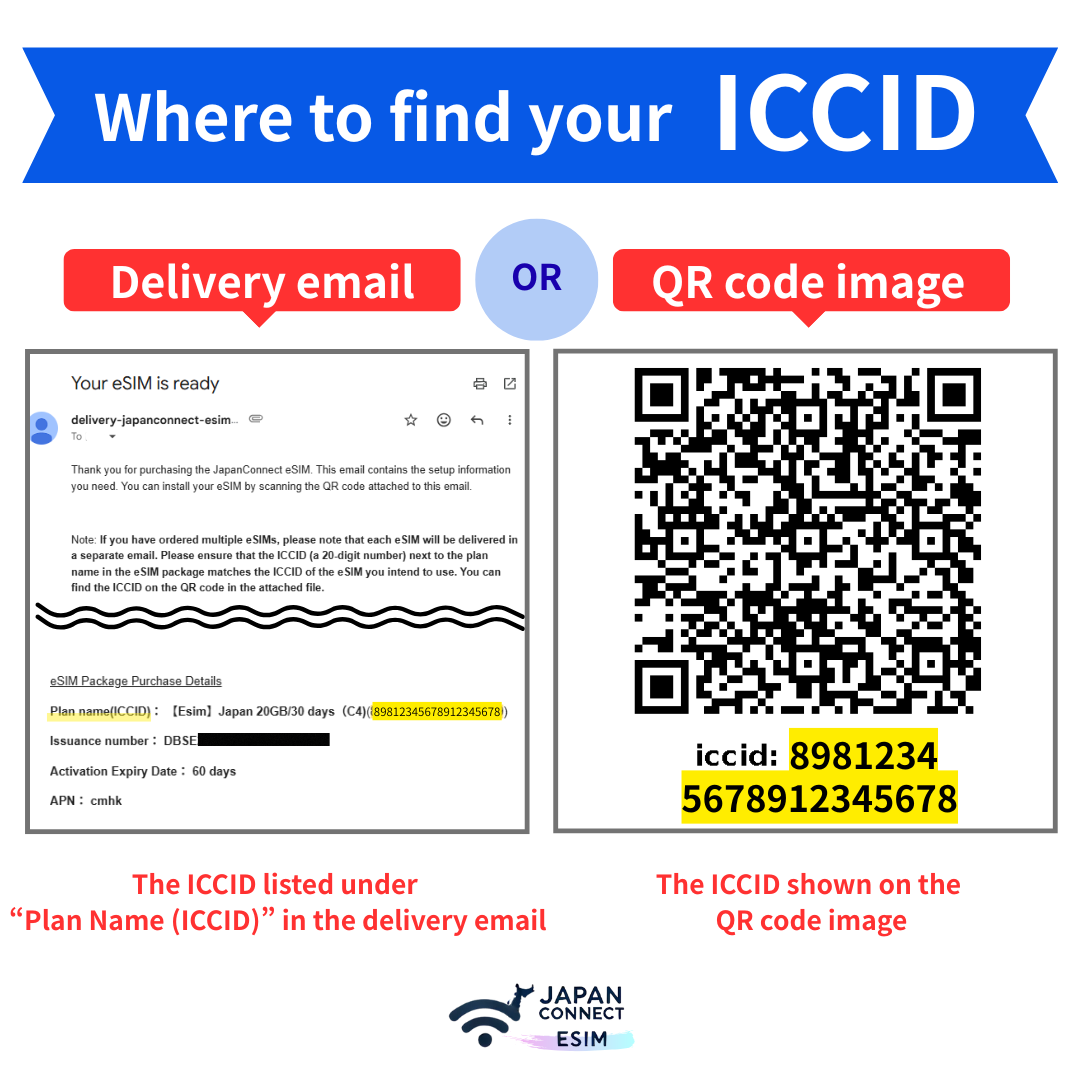
Where can I find the ICCID for my eSIM?
The eSIM ICCID is listed in the package contents section of the eSIM delivery email. It is also printed below the eSIM QR code.
I would like to know the APN and carrier for each eSIM package
Please check the APN and Carrier Quick Reference Table.
I no longer use my eSIM. Can I return it?
eSIM products with a cancellation guarantee can be returned and refunded within 30 days of purchase, if they have not been installed. If you wish to request a return or refund, please contact us through the return application form below. *Please note that once an eSIM is returned, it cannot be reused
If you wish to cancel your eSIM purchased on the official website
→ Click here for the application form.
If you wish to cancel your Amazon Store purchased eSIM, please contact us via
→ Amazon
Can I cancel my order if the device is not SIM-free or eSIM-compatible?
eSIMs with a cancellation guarantee can be canceled within 30 days of purchase, if they have not been installed.
Frequently Asked Questions About eSIM Installation
When is the best time to install the eSIM QR code?
We recommend that you install the eSIM under a stable Wi-Fi environment at least one day before your trip. For those who have purchased the Regional or Global plan, we recommend installing the eSIM just before your trip, as your destination country must be included in the supported countries.)
The eSIM will be activated once you arrive at your destination, turn on data roaming, and connect to the internet.
Where can I find EsimURL, SM+DP address and activation code?

These can be found in the body of the email sent upon delivery of the eSIM QR code.
How can I verify that the eSIM has been installed correctly?
You can check the installation status of JapanConnect eSIM anytime using the dedicated checker.
https://japanconnect-esim.store/esim-data-status/
※ Simply enter your ICCID to check real-time usage status.
– Data Remaining
– Usage Period
– Time Remaining
– Installation Status
How to install and activate the eSIM on iOS?
Install using QR code | iOS
Please check this page for detailed iPhone installation settings.
How to install and activate the eSIM on Android?
Install using QR code | Android
Please check this page for detailed settings for Android installation.
After scanning the QR code, it doesn't progress past 'Activating'.
If the eSIM is installed before arriving at the destination, it will display 'Activating' as it has not yet connected to the partnered carrier.
After some time, the 'Activating' status will automatically disappear, so please be patient. *On some devices, you may see 'Activation failed.' This is normal and expected before arriving in the destination country.
If the status remains 'Activating' after arriving at your destination, please try toggling airplane mode or restarting your device. Once the eSIM is added to the mobile data settings, activation will be complete.
If the purchased eSIM is not added to the mobile data settings, please scan the QR code again and reinstall it in a stable Wi-Fi environment.
It shows 'eSIM cannot be added'.
If you see 'eSIM cannot be added,' it may be due to one of the following reasons. Please check.
- Already have eSIM installed.
→Please check the status of your eSIM installation. - An
→ eSIM installed on another device can only be installed once. An eSIM installed on another device will not be available. - You are using a SIM-locked device
→JapanConnect eSIM is only available for SIM unlocked or SIM-free devices. If you wish to unlock your SIM, please contact your carrier. - VPN is turned on
→ Turn off VPN and try installing again. - The addition of an eSIM is restricted because the device is MDM managed under a corporate contract.
→ Please ask the person in charge of managing MDM at your company to allow you to add an eSIM.
It shows 'eSIM could not be set up.'
If you see 'eSIM could not be set up,' please try the following
- Restart your device.
- Scan the QR code again.
- If you are unable to scan the QR code, please manually enter the activation code.
It shows 'Activation failed. Please contact your service provider.'
If you install the eSIM before arriving at your destination, you may see the message 'Activation failed. Please contact your service provider,' even if the eSIM installation was successful.
Please check if the eSIM you purchased has been successfully installed in the mobile data settings.
In case the eSIM is not installed, please reinstall it under a stable Wi-Fi environment.
It shows 'Activation failed.
If you install the eSIM before arriving at your destination, you may see 'Activation failed' even if the eSIM installation was successful.
The eSIM installation may be complete. Please restart your device and check if the eSIM you purchased has been added to the mobile data settings.
If it has not been added, please try scanning the QR code again and installing it under a stable Wi-Fi environment.
It shows 'eSIM is not supported. This eSIM is not compatible with this iPhone.' and installation cannot be completed.
If you see 'eSIM is not supported. This eSIM is not compatible with this iPhone. For more information, please contact your carrier,' it may indicate that your iPhone is locked to a carrier.
Go to "Settings" app, then "General," then "Information," then "SIM Lock." " SIM Locked." If it is set to " SIM Locked ", SIM unlocking is required.
Please check with your carrier if you are using an iPhone. The carriers listed below allow you to request SIM unlock online.
For Docomo users
https://www.docomo.ne.jp/support/unlock_simcard/
For au users
https://www.au.com/support/service/mobile/procedure/simcard/unlock/
For SoftBank users
https://www.softbank.jp/mobile/support/usim/unlock_procedure/
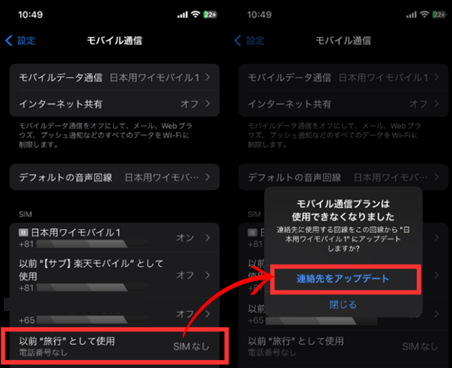
The installed eSIM cannot be found.
The eSIM that was successfully installed will be displayed with the name set during installation. Depending on the device, the default names may appear as "Personal", "Secondary Line", "Travel", "Work", "TGT", "Plus", "CMLink (CMHK)", etc.
To verify the installed eSIM, you can check the ICCID (approximately 20 digits) listed below the eSIM QR code using the Settings app by following these steps:
You can check the eSIM ICCID using the following steps.
◆How to check ICCID on iOS
(1) Open the Settings application
Tap "Mobile Communications
Tap the eSIM in the SIM section
(3) Turn on this line.
Return to the SIM item and tap the main line (the SIM you normally use).
(4) Return to the SIM section and turn off the main line (the SIM you normally use).
5) Restart the iPhone.
(6) After restarting, open the Settings application.
Tap General
Tap ⑦ Information
Check the number in the "ICCID" field (often found at the bottom of the screen).
(often located at the bottom of the screen)
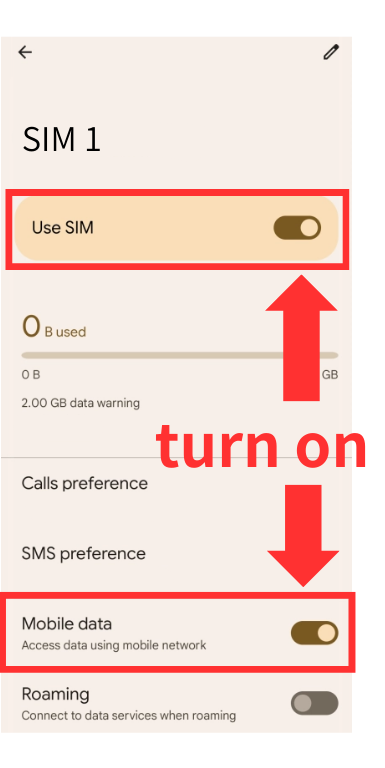
Android
(Items and procedures may differ depending on the Android model.)
(1) Open the Settings application.
②Tap Network and Internet
③Turn on eSIM for this time
(4) Open the default phone app.
(5) Enter "*#06#" to make a call.
The EID and other information will be displayed, and the eSIM ICCID is located at the bottom.
Please be assured that no calls will be made to anywhere using the above method.
When I installed the eSIM, mobile data was turned on. Does this mean the eSIM has been activated?
The eSIM can be turned on even after installation. eSIM usage starts when you turn on data roaming locally and connect to the Internet in the country where the eSIM data plan is supported.
(If you have purchased a Round-the-Asia or Round-the-World plan, please install the eSIM immediately before your trip and turn on the roaming setting in the country you will be visiting, as Japan is included in the supported countries).
My eSIM is just displayed as a previously used secondary line (e.g., Travel, Personal). Is this a problem?
On some iPhone and Android devices, if you turn off the eSIM line after installation, it may appear as "Previously used as a secondary line (e.g., Travel, Personal)." However, the eSIM will not be activated until you turn on mobile data and enable data roaming after arriving at your destination. No need to worry.
The mobile settings for the eSIM display "infra," "CMI," "CMLink (CMHK)," "Plus," "Orange," and "TGT."
The displayed name for each eSIM's mobile data settings corresponds to the APN carrier partnered with Japan Connect eSIM. While this varies by package, most packages use "infra," "CMI," "CMLink (CMHK)," "Plus," "Orange," or "TGT." The displayed name also differs depending on the device model you use.
What should I do if I accidentally delete an installed eSIM?
First, try reinstalling the eSIM by scanning the QR code on the device where it was originally installed.
● Questions about real name authentication
Which packages require real name authentication?
Packages requiring real-name authentication are all data plans listed below.
- eSIM for Japan | docomo line | Unlimited Data | 5-25 days
- China, Macau, Hong Kong | eSIM | Unlimited | 1GB-50GB | 1 day-30 days | High Speed Data Communication
*The countries requiring real name authentication for the above packages are "Hong Kong" only, and those visiting only Mainland China and Macau do not require real name authentication.
Can I connect to the Internet without real name authentication?
Internet access is available in countries other than Taiwan and Hong Kong without requiring real name authentication.
If you are traveling to Taiwan or Hong Kong, you will not be able to connect to the Internet without authenticating your real name.
What is Taiwan/Hong Kong real name authentication?
eSIM real-name authentication refers to the procedure in certain countries and regions, such as Taiwan and Hong Kong, where users must present identification documents (such as a passport) to verify their identity when registering to use an eSIM. This policy is implemented by the relevant countries to prevent crime.
How can I authenticate my real name in Taiwan and Hong Kong?
Please refer to the "Taiwan/Hong Kong Package", the manual for starting to use the eSIM, which is included in the eSIM delivery e-mail.
Real name authentication in Taiwan and Hong Kong is not progressing due to an error.
Please try changing your browser app or device (PC or smartphone). Some browsers may cause errors when automatic translation converts text into Japanese.
Also, depending on the package you are using, an error may occur if the eSIM is not installed. Please try again to perform the real-name authentication after installing the eSIM.
Real-name authentication for children under 16 in Taiwan and Hong Kong is not progressing.
If you are under 16 years old, please use your parent's passport for application. If a parent registers two or more eSIMs under his/her own name, there is no problem.
However, there is a limit to the number of times the same passport can be used to authenticate the applicant's real name: 3 times in Taiwan and 10 times in Hong Kong, so please consult with us in advance if you plan to apply more than the specified number of times.
I did not receive an email confirming the completion of my real name verification.
The real name authentication required for eSIM use in Taiwan and Hong Kong is performed by the authentication system operated by CMLink (China Mobile International Co., Ltd.), not by us.
Even after authentication is completed, you may not receive a completion e-mail due to transmission from an overseas server or due to spam filters on the receiving end, but in most cases, the authentication is completed successfully.
If you do not receive the e-mail, please check your spam folder or reception settings.
If you are not sure, please contact us so that we can check the status of the authentication. Please note that we cannot resend the e-mail because the operator of the system is different from us.
Real name authentication failed. The message "The registration limit of the ID3 card has been exceeded. What should I do?
| CMLink (005): failed to register real name for Global Data SIM Card ID: 898XXXXXXXXXXXXXXXXXXX. The registration limit for ID3 cards has been exceeded. Please click the link below to update your information and resubmit. Contact us: https://global.cmlink.com/store/realname?iccid=898XXXXXXXXXXXXX&change=0 |
---------- ---------- -------------------------
The above message means that the maximum number of real names that can be authenticated with the same passport has been exceeded.
For Taiwan → Up to 3 cumulative
* For Taiwan eSIM, eSIMs that are 180 days old after real name verification will be automatically reset and re-registered.
For Hong Kong → Up to 10 cumulative
* Hong Kong eSIM does not reset automatically, so you need to apply for reset.
If the limit has been reached, you will not be able to register a new eSIM with real name authentication. To make it available, you need to send an e-mail to CMLink Support (cs@cmlink.com), which operates the real-name authentication site, to request cancellation. The cancellation usually takes 3~15 days maximum, so if you are in a hurry, we recommend that you apply with the passport of a family member or a companion.
Questions After Arrival
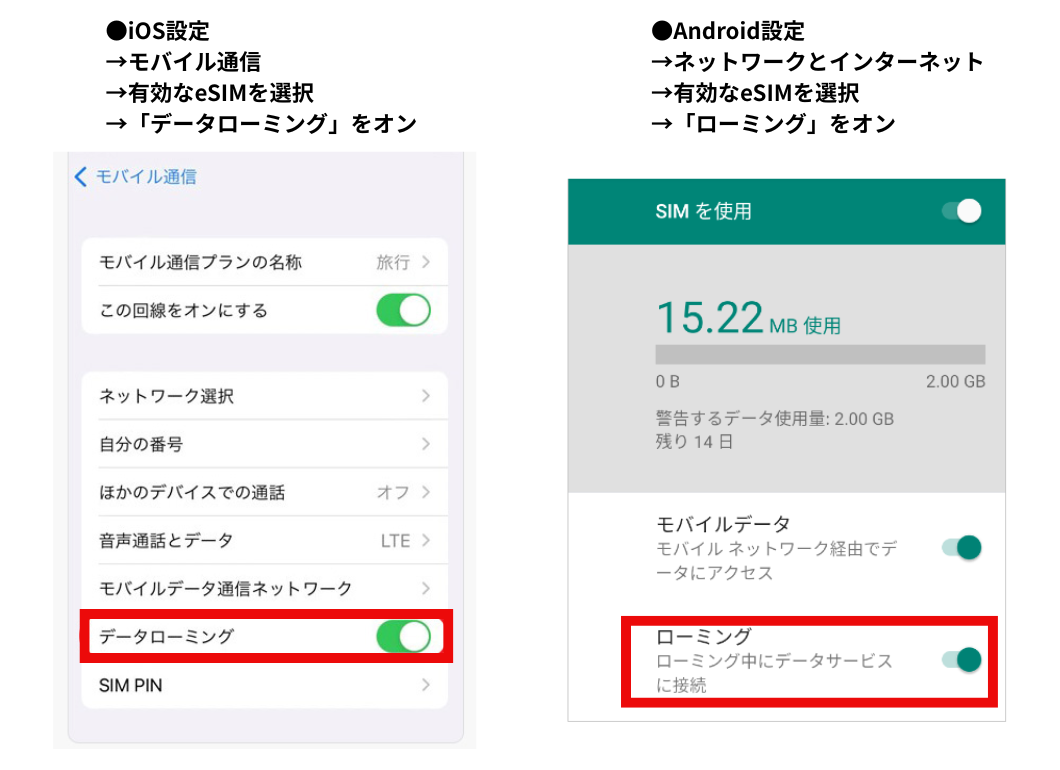
Will my eSIM connect automatically when I arrive?
Upon arrival there, you will need to turn off Airplane Mode and switch your Cellular the eSIM purchased in steps (1) and (2).
◆---- -------------------------
(1) Switch to mobile data communication for the eSIM you purchased
(2) Turn on data roaming
----- ------------------------◆
(1) For "Mobile Data Communication", select a valid eSIM.
For mobile data communication, please refer to the image below and change to the eSIM to be used in the destination country.
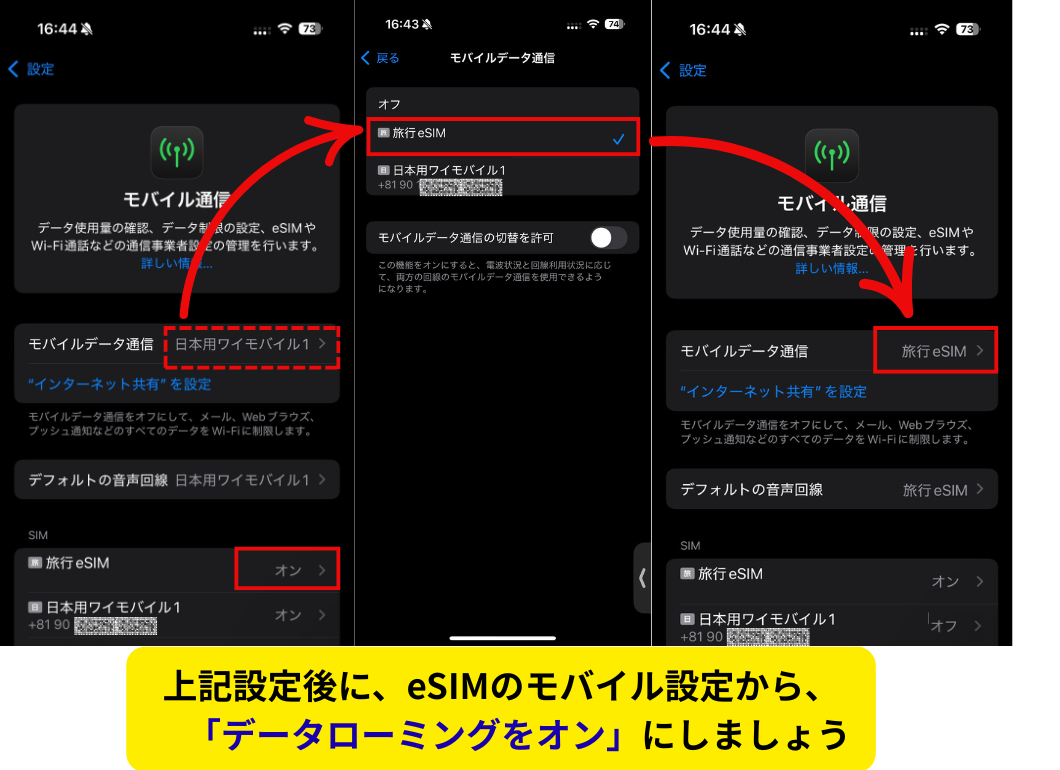
The screen is Pixel 6a. Android operation methods may vary by model.
(2) Turn on data roaming for the eSIM purchased.
The screens shown are iPhone and Pixel 6a. Android operation methods may vary by model.
I cannot connect to the Internet.
↑You can watch it on this page by pressing the play button.
Please check the following for each device. (If the settings in (1) to (4) below are OK, please try restarting the power supply.
◆---- -------------------------
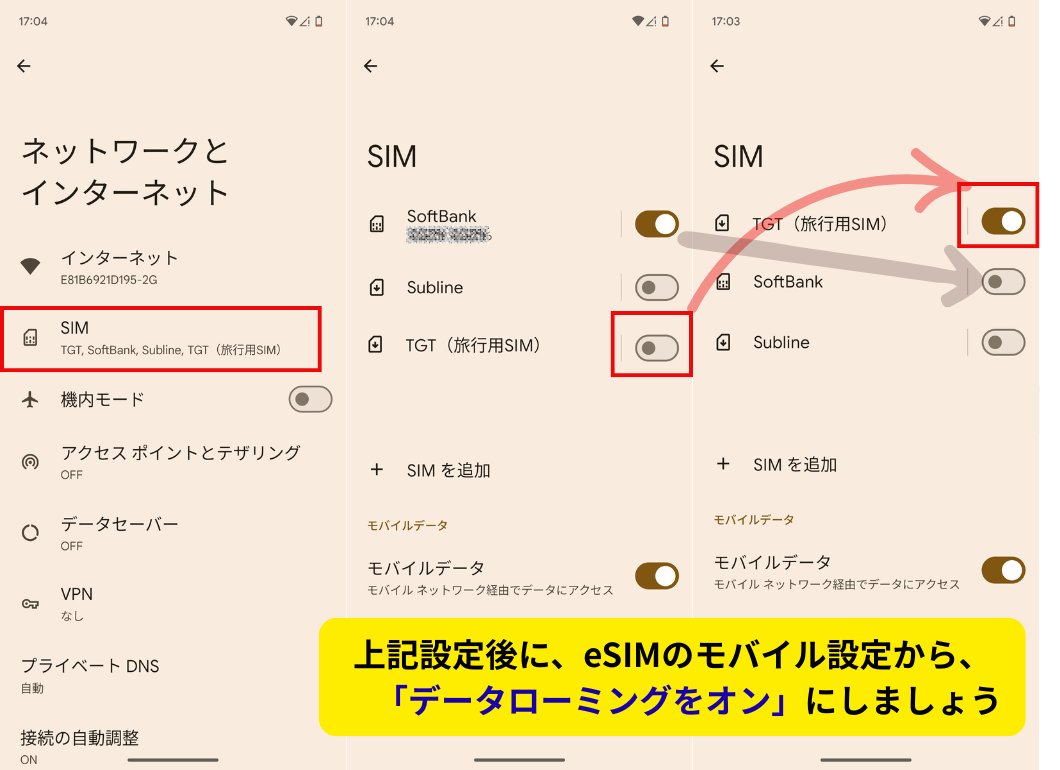
(1) For "Mobile Data Line", have you selected a valid eSIM?
2) Is data roaming turned on for the eSIM you purchased?
(3) Check if the connection is made to the corresponding local carrier.
④Check if the APN setting is correct.
----- ------------------------◆
(1) Has a valid eSIM been selected for "Mobile Data Communication"?
For mobile data communication, please refer to the image below and change to the eSIM to be used in the destination country.
The screen is Pixel 6a. Android operation methods may vary by model.
(2) Is data roaming for the selected eSIM turned on?
The screens shown are iPhone and Pixel 6a. Android operation methods may vary by model.
(3) Set the network setting from "Automatic" to "Manual" and check if you are connected to the corresponding local telecommunication carrier.
The corresponding local carrier is listed in the delivery e-mail. The corresponding local "carriers" are also listed in the delivery e-mail.

④Check that the APN is set correctly for the eSIM package.
The APN is automatically set when installing the eSIM. However, if it does not match the APN provided in the email, please update it manually.
*The corresponding APN for each package is listed in the email you received. You can also find it in this quick reference table.
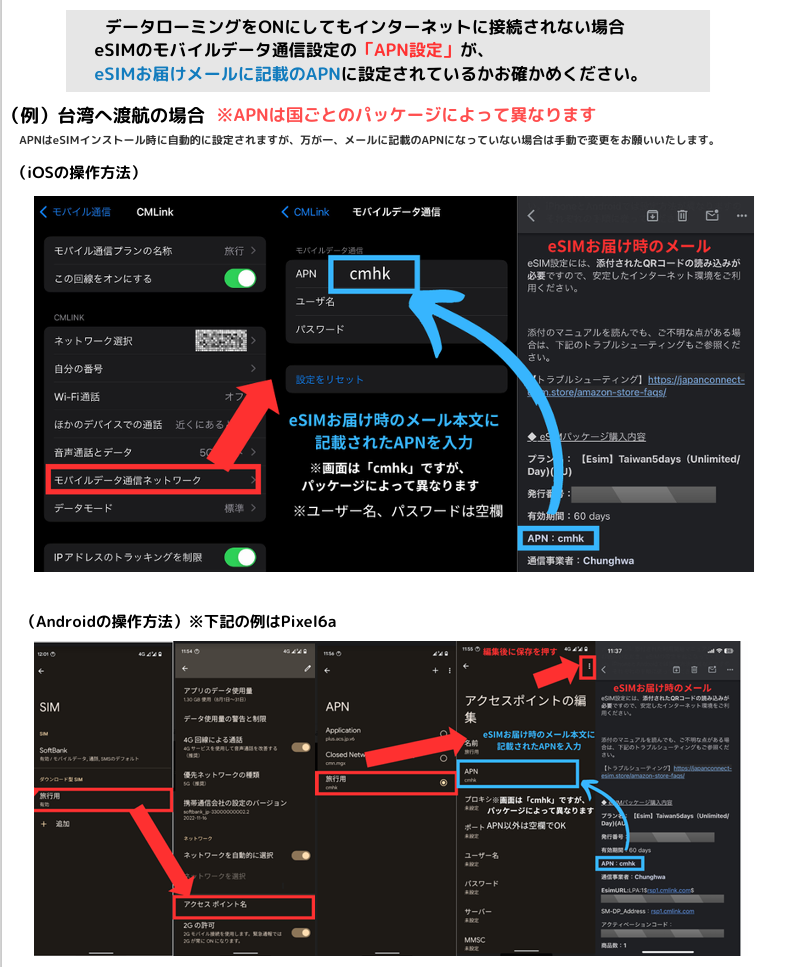
After setting the APN, please restart your device
How can I check my data usage?
You can check your JapanConnect eSIM data balance and validity period anytime using the dedicated checker.
https://japanconnect-esim.store/esim-data-status/
※ Simply enter your ICCID to check real-time usage status.
– Data Remaining
– Usage Period
– Time Remaining
– Installation Status
Check from your smartphone settings You can also check your data usage on the device itself.
・iOS
Settings > Cellular
You can check total data usage to total.
Android
Settings > Network and Internet >
Select the relevant eSIM > Data usage to check data traffic.
※ The smartphone display is for reference only. Please check the exact remaining data amount using the dedicated checker above.
I was able to use the internet before, but now I can't connect. What should I do?
Please check that data roaming is turned on and that your device is connected to a supported carrier listed in the quick reference table.
Additionally, your data plan may have run out or expired. Please check the details of your purchased data plan.
My mobile data settings show '2GB'. What does this mean?
For Android devices, the default mobile data setting may be set to "2GB".
This is a setting that notifies you of data usage estimates, and it does not indicate that your purchased data plan is "2GB".
What happens if my data plan expires?
Once the validity period expires, you will no longer be able to use the remaining data.
Can I top up my data?
Each eSIM data plan is a one-time purchase and cannot be topped up. You will need to purchase a new plan.
Can I extend the period of use?
Since eSIM is a buy-one-get-one-free type, the usage period cannot be extended. Re-purchase is required.
Why does "E" appear on the antenna pictogram when connecting to eSIM?
The "E" stands for "EDGE (GSM) network. This is an older communication standard with slower transmission speeds, but it may appear immediately after activation with temporarily unstable communication.
After activating the eSIM, it will automatically switch to 5G/4G after a few minutes or after moving to an area. It may turn to "E" in buildings, crowded places, and underground corridors.
In case the communication speed is still slow with "E", please try the following remedies.
- Turn Airplane Mode from ON to OFF
- Restart the terminal
- Change the network selection to manual and change to the carriers listed in the Quick Reference Table.
Questions After Returning Home
【iOS】What should I do with an eSIM after using it?
First, turn on mobile data for your original SIM and check if you can access the internet.
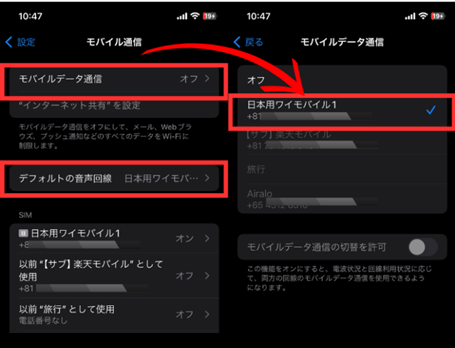
How to Delete an eSIM After Use | iOS
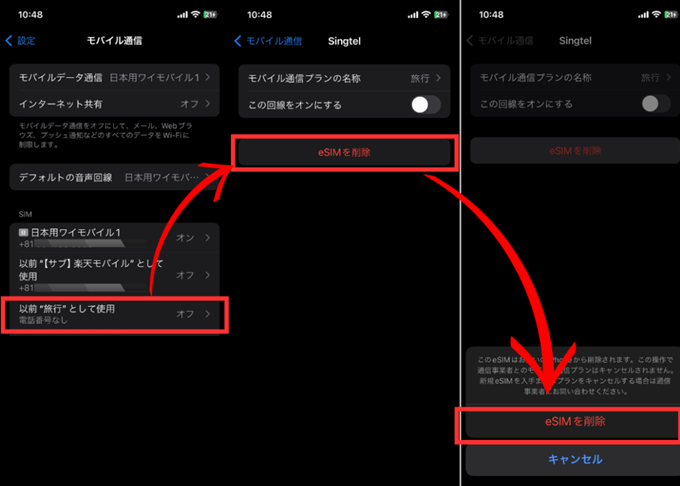
Go to Settings → Cellular → Select the eSIM for international use → Tap Remove eSIM → Tap Remove eSIM again.
(Once deleted, the eSIM cannot be reinstalled. Please make sure the eSIM you are deleting is no longer needed before proceeding.)
Go to Cellular settings, select the deleted international eSIM, and perform a Contact Update.
【Android】What should I do with an eSIM after using it?
First, turn on the mobile data line of the SIM you used before in Japan to see if you can connect to the Internet.
(The screen is a Pixel 6a. The operating procedure may differ depending on the model)
.png)
Select the SIM card or mobile line you were originally using.
Turn on mobile data.
How to Delete an eSIM After Use | Android
Screenshots are from a Pixel 6a. The steps may vary depending on your Android device.

Go to "Settings" > "Network & Internet" > "SIM," select the eSIM for overseas use, and tap "Delete SIM" > "Delete."
(Once deleted, the eSIM cannot be reinstalled. Please make sure the eSIM you are deleting is no longer needed before proceeding.)
Questions About Orders for Amazon Store Purchases
Where will I receive the QR code for eSIM installation?
We will send it to you within the Aamazon account message center. *Please be sure to check your message center, as you may not receive it via email.
How to check your Amazon Account Message Center
Open the Accounts tab in the app version or Accounts & Lists in the web version, then go to Account Services.
On the next screen, scroll down the screen and select the message in the "Message Center". Then open the seller's message to see the list of replies received.

Amazon Message Center not found
You can check the Amazon Message Center by
How to check on a computer

Select "Account Services" from "Accounts & Lists" in the upper right corner.
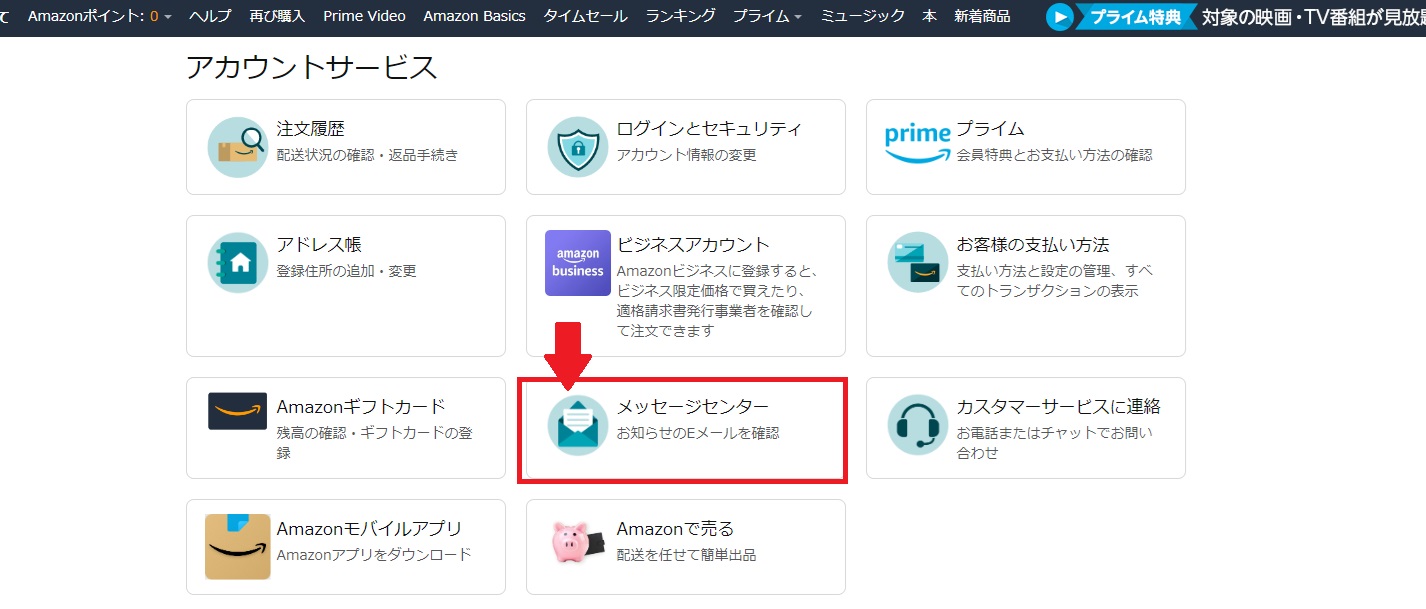
Press Message Center.

Please check JapanConnect eSIM messages from "Purchaser/Seller Messages".
How to check with a smartphone
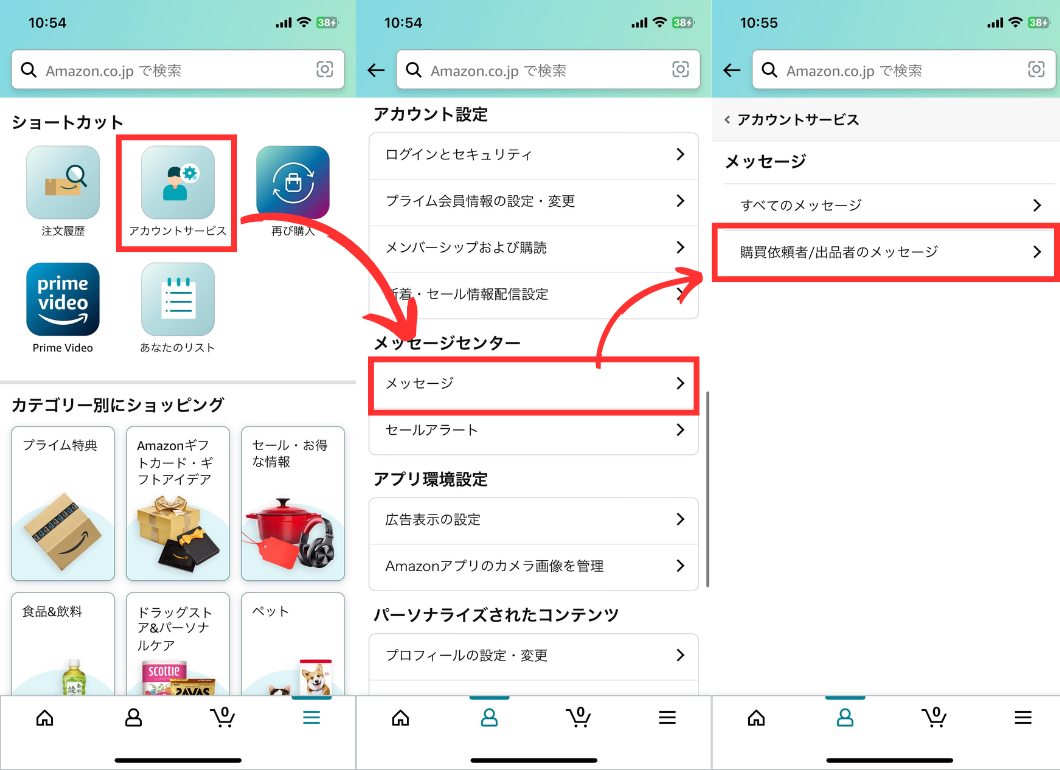
Please check JapanConnect eSIM messages under "Menu" on Amazon Home, then "Account Services" > "Message Center" > "Purchase Requester/Seller Messages".
I have not received the eSIM QR code in the Amazon Message Center.
If you do not receive an email from JapanConnect eSIM via Amazon Message Center, please contact us via Amazon Message Center.
How do you issue invoices?
Invoices can be downloaded from the Amazon store at:
https://www.amazon.co.jp/gp/help/customer/display.html?nodeId=TgeQoI2TC9jEOh0mQf