After returning from Japan, how to delete or remove your Japan travel eSIM?
This guide explains how to delete eSIM from iPhone, how to remove eSIM from iPhone, and how to delete or remove eSIM on Android. We also show how to switch back to your home-country SIM so you can use your regular mobile carrier again.
If your SIM is not working after returning from Japan, we also provide troubleshooting steps to restore calls and internet access.
Koki Abe
eSIM Portal Administrator
Contents
How to Delete Japan Travel eSIM from iPhone
Let’s get started with how to delete eSIM from iPhone after returning from Japan and how to restore your internet connection with your home-country SIM.
This section will guide you step-by-step through how to remove eSIM from iPhone used during your Japan trip. If you are using an Android device, please check the next section here.
The process for deleting a used Japan travel eSIM on iPhone and switching back to your regular mobile network is as follows:
How to Delete a Used eSIM After Returning | Switch Back to Your Home SIM (iPhone)
We will now go through these steps one by one, with iPhone screenshots for easy reference.
STEP0. Turn Off Airplane Mode
First, as a basic step, turn off Airplane Mode when you arrive at your home country’s airport. If Airplane Mode is on, you’ll only be able to use the internet via WiFi.
STEP1. Turn OFF data roaming for the Japan travel eSIM
Turn off data roaming for your Japan travel eSIM. Even if you already turned it off while in Japan, double-check that the eSIM is still disabled.
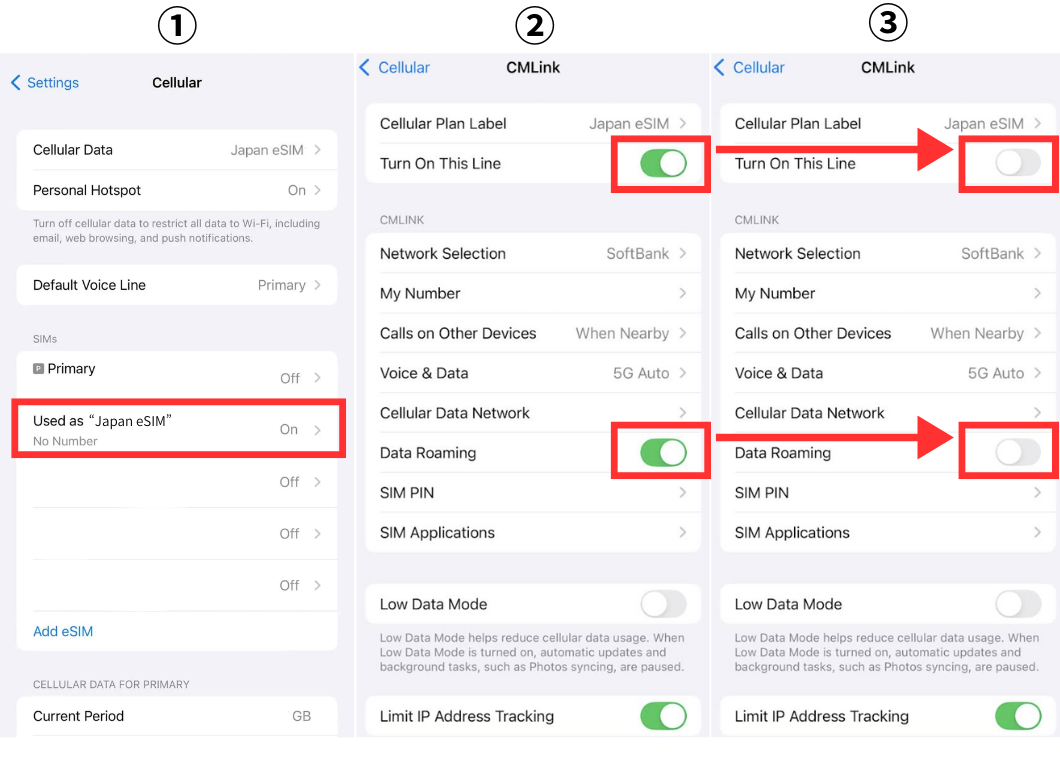 |
| Go to “Settings” → “Mobile Service” → select your Japan eSIM, then turn off “Turn On This Line” and “Data Roaming.” |
STEP2. Turn ON mobile data for your home-country SIM
Next, enable mobile data for your SIM used in your home country (including eSIMs). Once you can access the internet, your home SIM is ready to use!
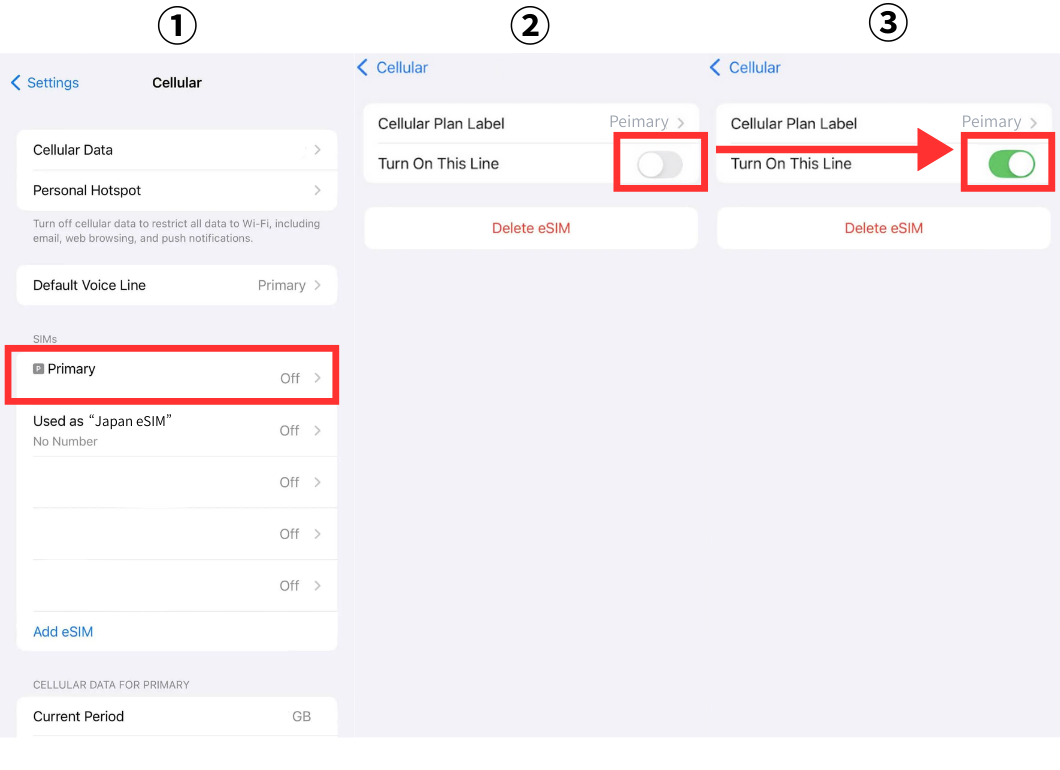 |
| Go to “Settings” → “Mobile Service” → select your home SIM (or eSIM) and turn on “Turn On This Line.” |
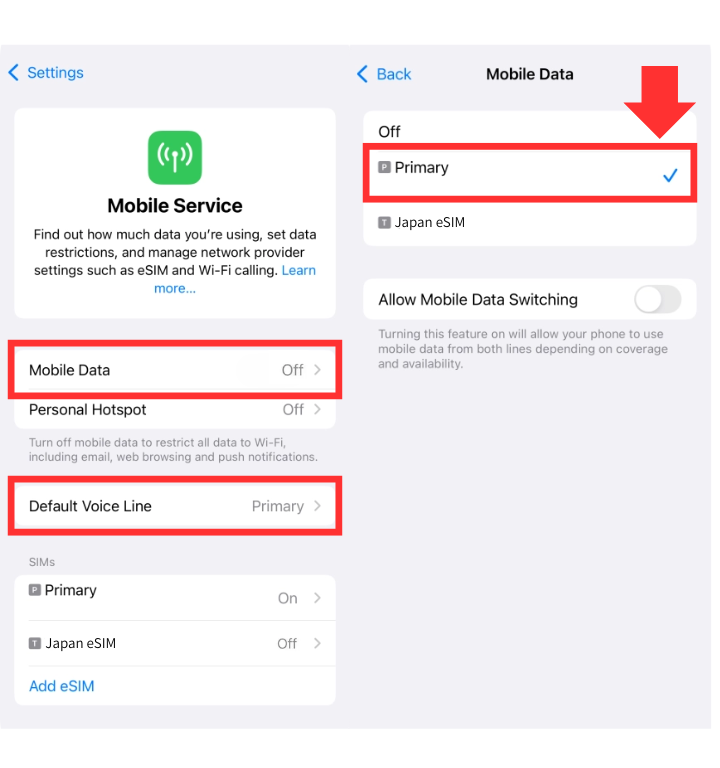 |
| Check that “Mobile Service” and “Default Voice Line” are enabled. If not, turn them on. |
STEP3. Delete the Japan travel eSIM from your iPhone
Once your home SIM’s mobile data is on and you can access the internet, you can remove the Japan travel eSIM.
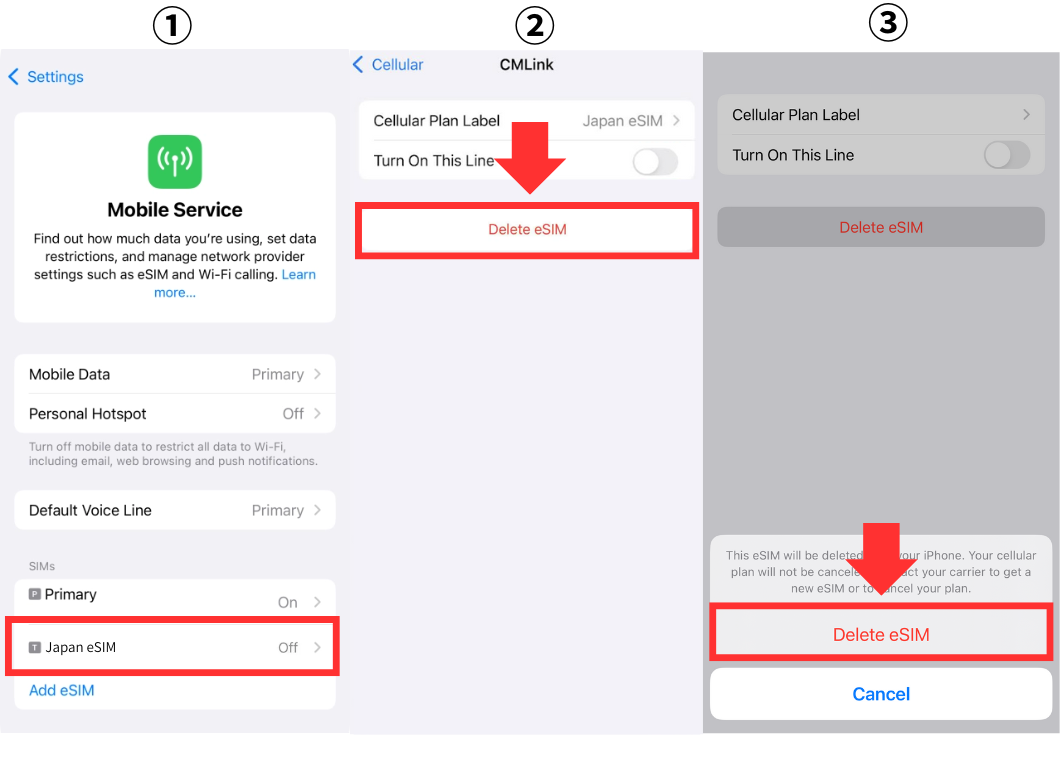 |
| Go to “Settings” → “Mobile Service” → select the Japan eSIM → tap “Delete eSIM” → confirm “Delete eSIM.” (Once deleted, the eSIM cannot be reinstalled. Make sure you really no longer need it before deleting.) |
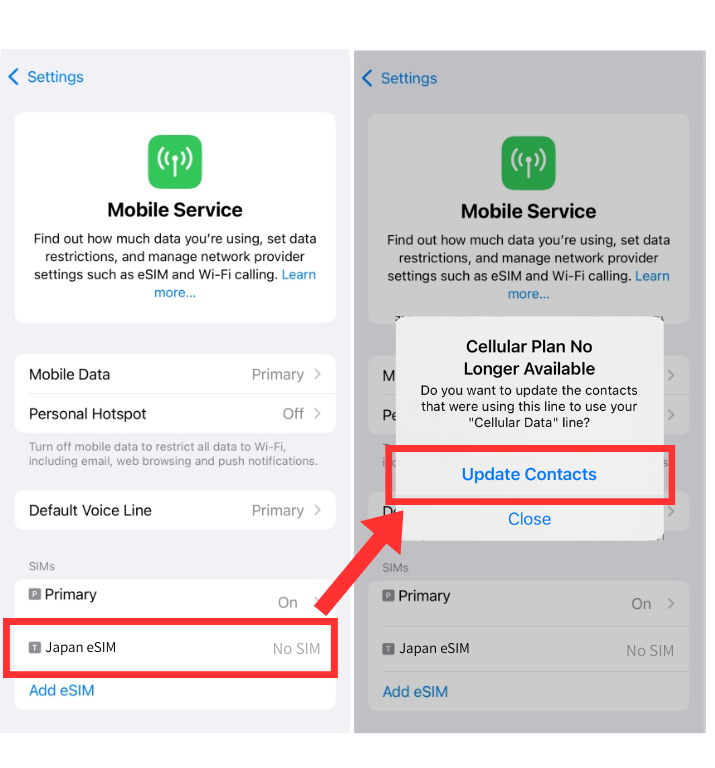 |
| After deleting the Japan eSIM, select it in “Mobile Service” and run “Update Contacts” to complete the process. |
How to Remove Japan Travel eSIM on Android
Now, let’s go through the process of how to delete eSIM on Android after returning from Japan, and how to switch back to your home-country SIM so you can use the internet again with your regular mobile carrier.
The step-by-step flow to remove a used Japan travel eSIM on Android and restore your device to your home network is as follows:
How to Delete a Used eSIM After Returning | Switch Back to Your Home SIM (Android)
We will now explain each of these steps in detail, with Android screenshots for easy reference.
STEP0. Turn Off Airplane Mode
As a first step, make sure to turn off Airplane Mode when you arrive at your home country’s airport. If Airplane Mode is on, your device will only be able to connect to the internet via WiFi.
STEP1. Turn Off Data Roaming for Japan eSIM
First, turn off data roaming for your Japan travel eSIM. Even if you already switched it off while in Japan, double-check that it’s disabled.
※Screenshots are from a Pixel 7pro. Steps may vary depending on your Android device.
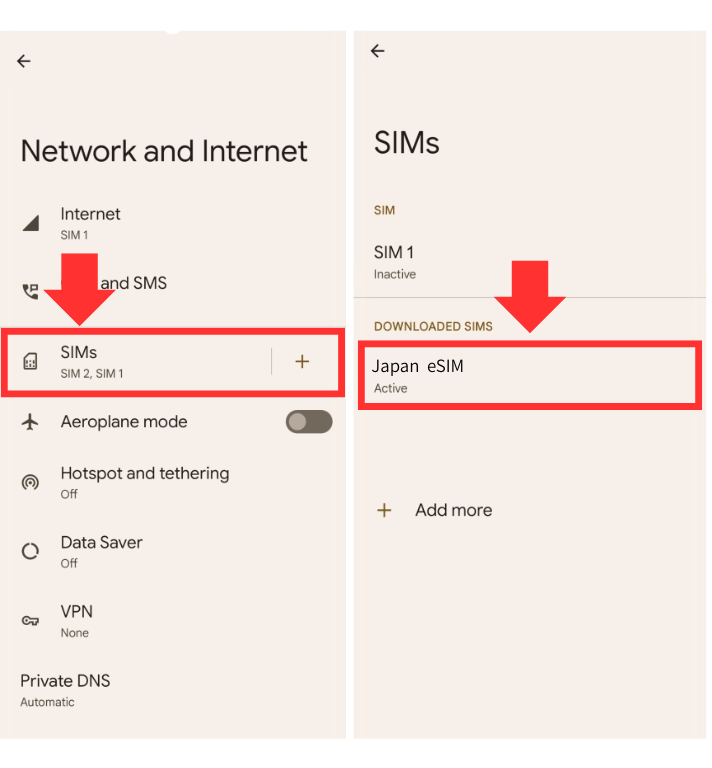 |
| Go to “Settings” → “Network and Internet” → “SIMs” → select your Japan eSIM. |
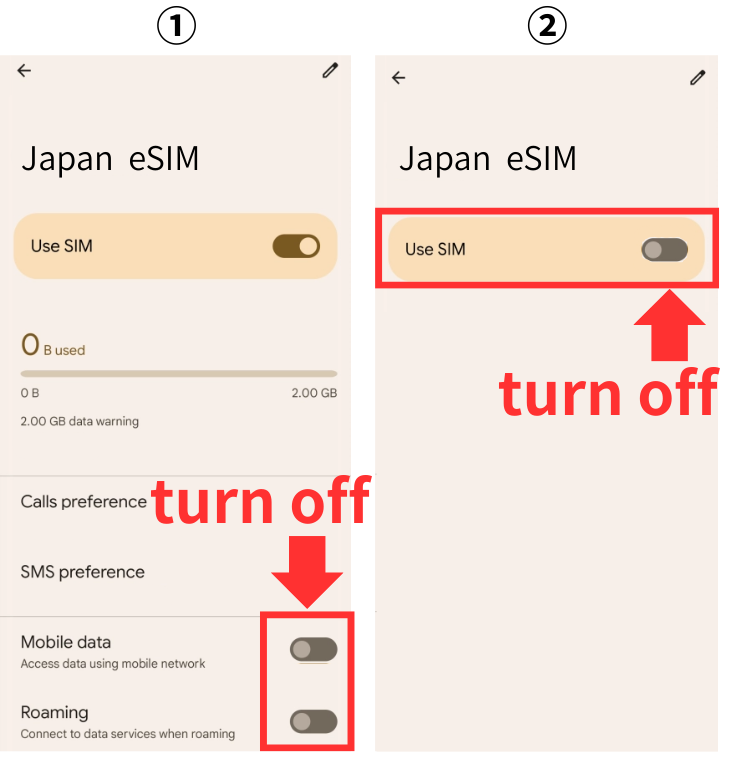 |
| Turn off “Mobile data,” “Roaming,” and “Use SIM.” |
STEP2. Turn On Mobile Data for Your Home Country SIM
Next, enable mobile data for your SIM (or eSIM) from your home country. Once your internet connection works, your home country eSIM setup is complete!
※Screenshots are from a Pixel 7pro. Steps may vary depending on your Android device.
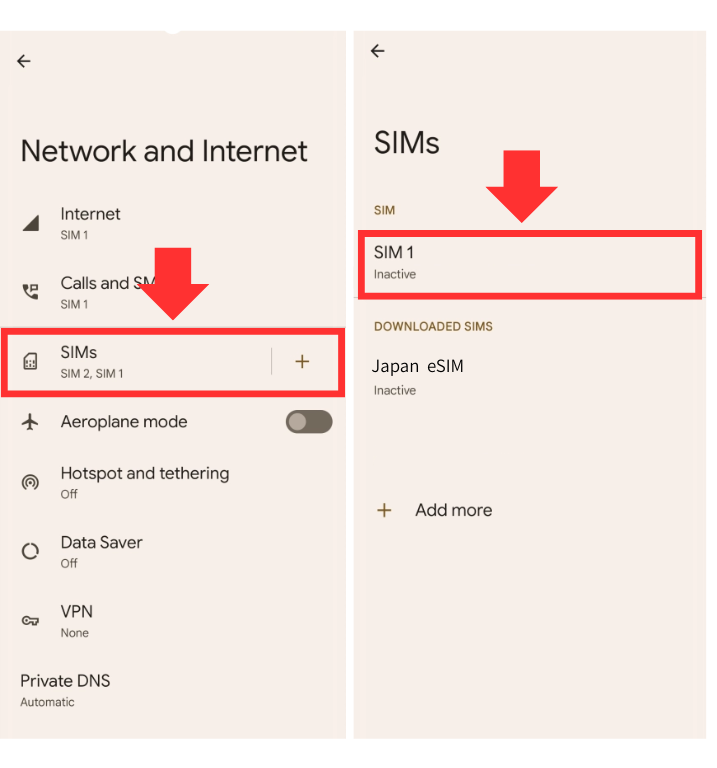 |
| Go to “Settings” → “Network and Internet” → “SIMs” → select your home country SIM (eSIM). |
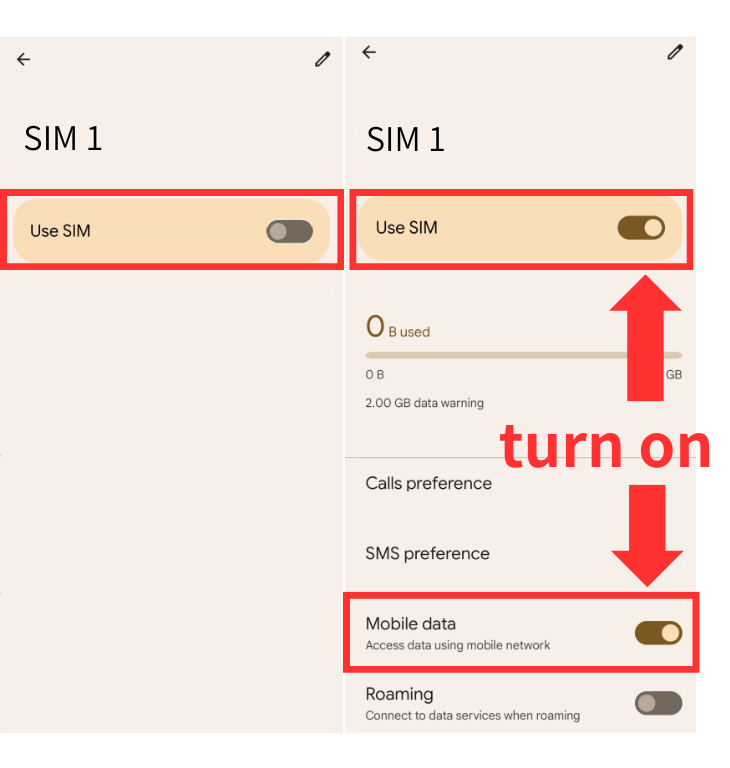 |
| Turn on “Use SIM” and “Mobile data.” |
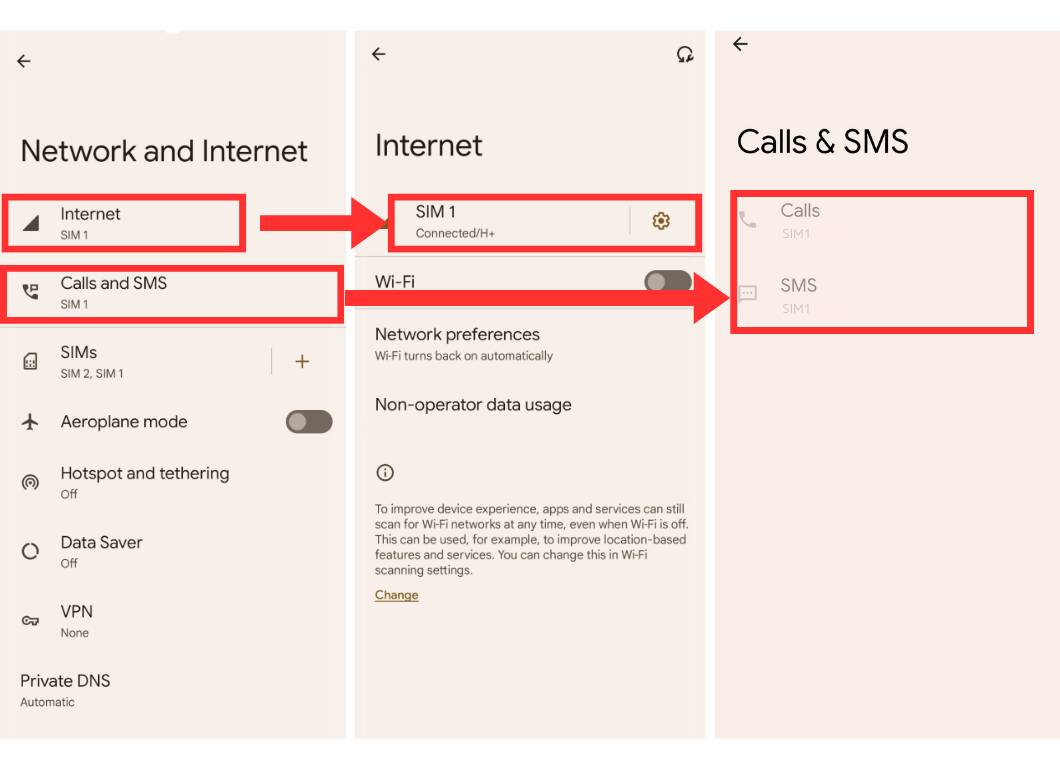 |
| Confirm that “Internet” and “Calls & SMS” are set to your home country carrier. If not, set them as the default. |
STEP3. Delete the Japan Travel eSIM
Once your home country carrier’s mobile data is active and you can connect to the internet, it’s time to remove the Japan travel eSIM.
※Screenshots are from a Pixel 7pro. Steps may vary depending on your Android device.
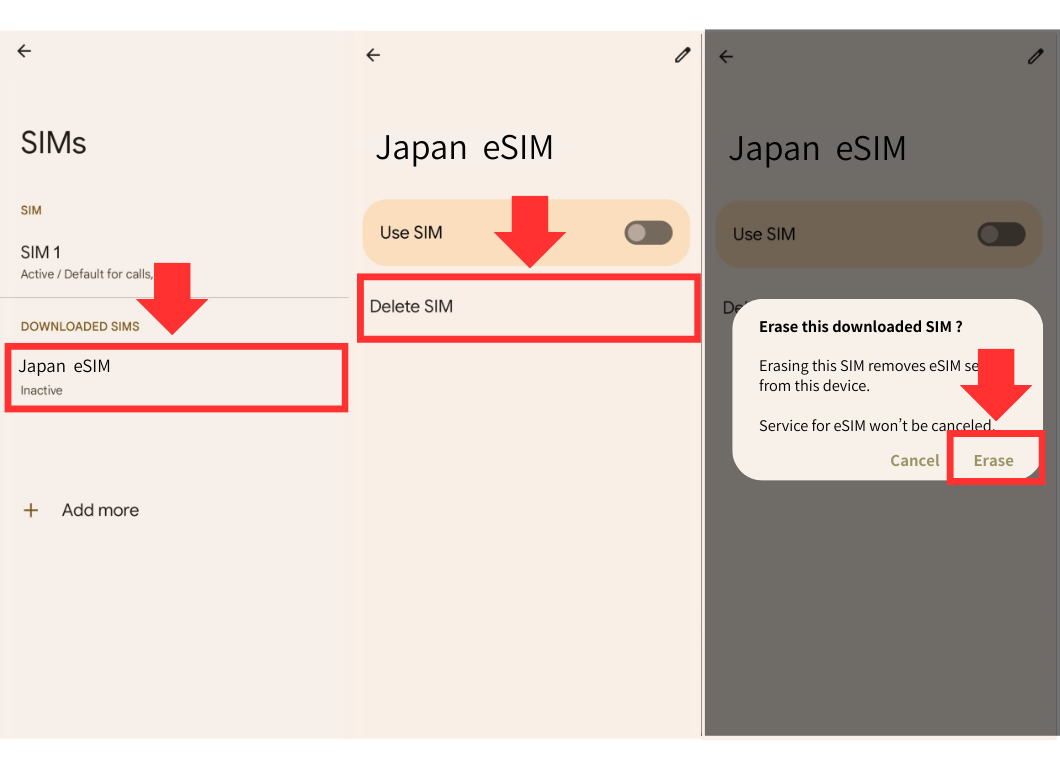 |
| Go to “Settings” → “Network and Internet” → “SIMs” → select the Japan eSIM, then tap “Delete SIM” → “Erase.” (Once deleted, the eSIM cannot be reinstalled. Make sure you really don’t need this eSIM before deleting it.) |
SIM Not Working After Returning Home From Japan? (Fix Guide)

In this section, we will cover troubleshooting steps if your home-country SIM is not working after returning from Japan.
Many travelers report issues such as “SIM not working after returning from Japan trip” or being unable to reconnect to their local carrier. The following methods can help restore your connection.
7 Ways to Fix Home-Country SIM Not Working After Returning from Japan
Set Network Selection to Automatic
Make sure your home country SIM’s network setting is set to “Automatic.” Here’s how to check it on both iPhone and Android with screenshots.
iPhone Network Settings
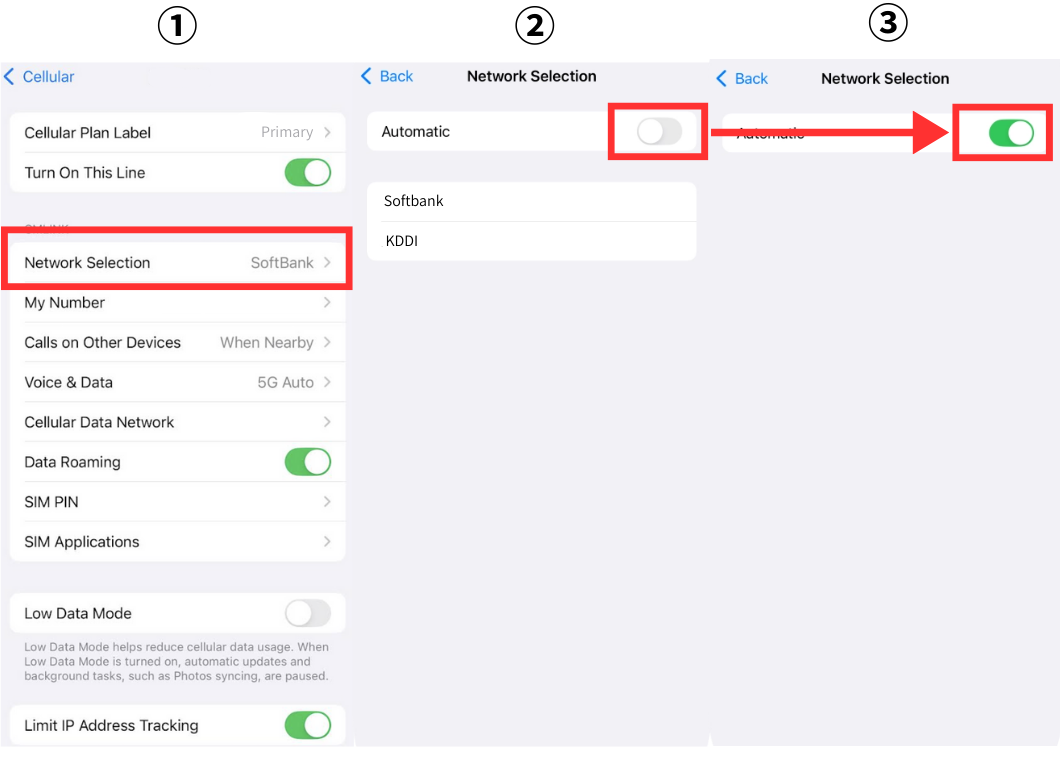 |
| Go to Settings → Mobile Service → Select your home country SIM → Network Selection → Turn on “Automatic” |
Android Network Settings
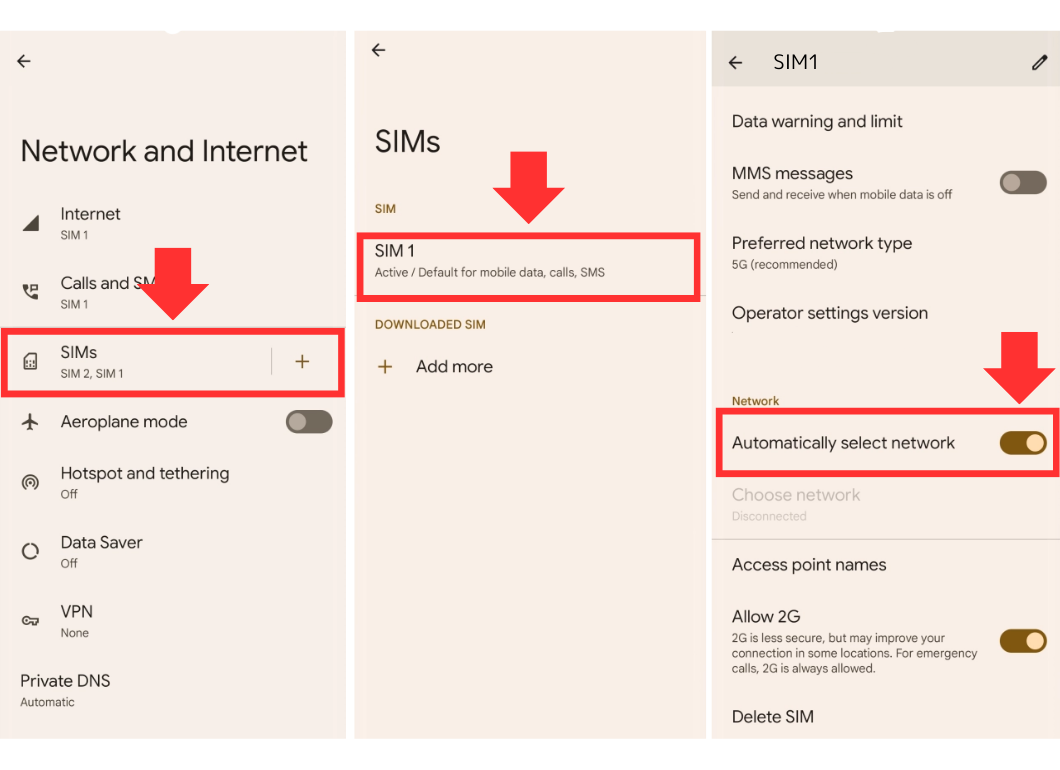 |
| Go to Settings → Network and Internet → SIMs → Select your home country SIM → Turn on “Automatically select network” |
※Screenshots are from a Pixel 7pro. Steps may vary depending on your Android device.
Toggle Airplane Mode On and Off
If your home country SIM isn’t switching properly, try turning Airplane Mode on and then off. This forces your phone to reconnect to nearby mobile network towers, which can often resolve connectivity issues.
Restart your device
Try restarting your smartphone. Temporary glitches or failed network handovers can often be fixed simply by powering off and on again.
Remove and reinsert the SIM card
If you’re using a physical SIM with your home country carrier, remove it from the SIM slot, clean it gently, and reinsert it. Poor contact between the SIM and the slot can cause connection issues, and reseating the SIM often resolves them.
Reset network settings
Sometimes, leftover Japanese network settings on your iPhone or Android—like Wi-Fi history, APN settings, or roaming preferences—can interfere with your home country SIM.
Performing a network settings reset often restores normal connectivity for your home carrier.
Note that resetting network settings will erase Wi-Fi passwords, VPN configurations, and Bluetooth pairings, but it won’t delete other personal data like photos or apps.
Items Reset When Performing Network Settings Reset
When you reset network settings, previously used networks and VPN settings that weren’t installed by a configuration profile or mobile device management (MDM) are removed.
Wi-Fi is turned off and then back on, disconnecting you from any network you’re on. The Wi-Fi and Ask to Join Networks settings remain turned on.
Source: https://support.apple.com/guide/iphone/reset-iphone-settings-iphea1c2fe48/ios
How to Reset Network Settings on iPhone
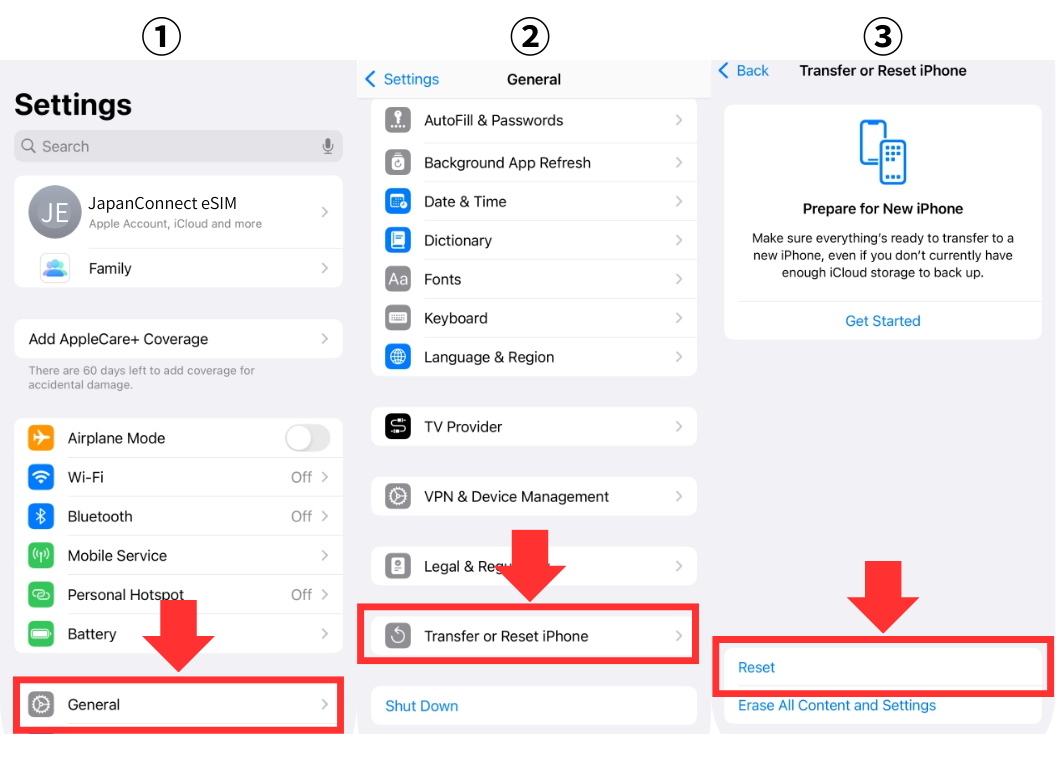 |
| Go to Settings → General → Transfer or Reset iPhone → Reset. |
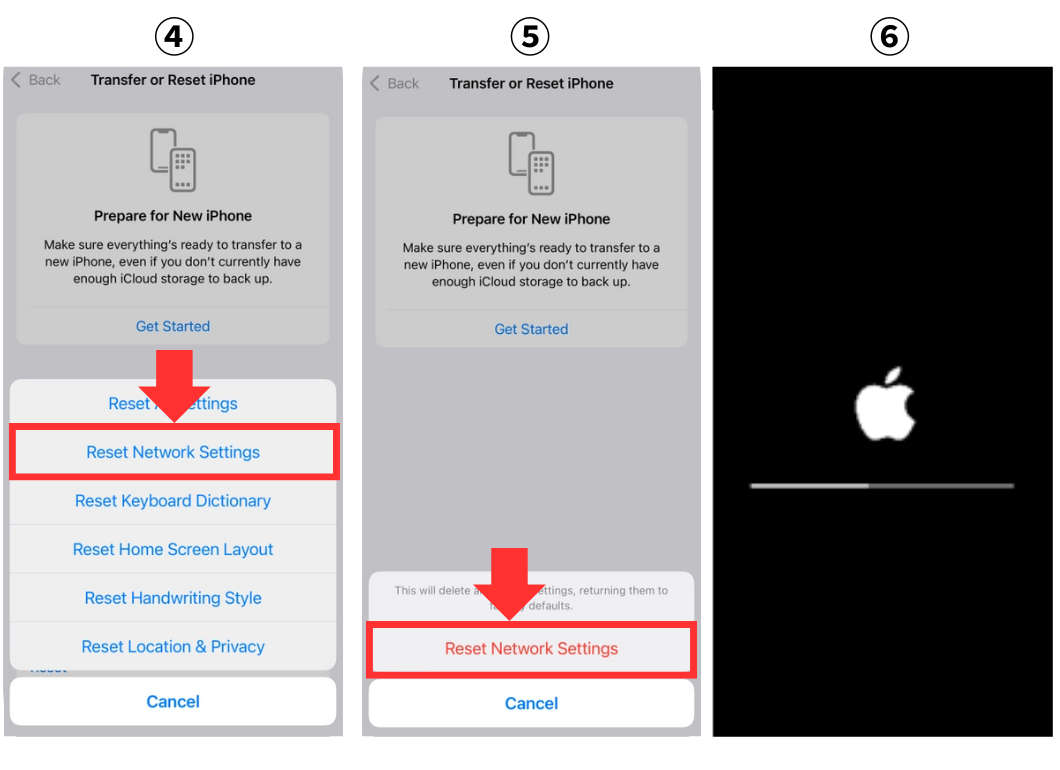 |
| Tap Reset Network Settings. Your iPhone will show the Apple logo and restart, completing the process. |
How to Reset Network Settings on Android
*The menu names may vary depending on your device or Android version. Check your manufacturer or carrier website for details.*
Android Network Settings Reset Steps
- Open the “Settings” app
- Tap “System” or “General Management”
- Select “Reset Options” or “Reset”
- Choose “Reset Wi-Fi, Mobile & Bluetooth” or “Reset Network Settings”
- Tap “Reset Settings”
- Enter your screen lock PIN if prompted
- Tap “Reset Settings” again to confirm
After the reset, your phone may automatically restart, and all network settings will be restored to their defaults.
Check if the Profile for Your Home Country SIM Is Installed
When you set up a Japanese SIM, there’s a chance that the profile for your home country SIM was removed.
For many budget SIMs, installing a profile is required. Make sure that the profile for your home country SIM is still installed.
If the profile has been deleted, you will need to reinstall it. You can usually do this from your mobile carrier’s official website or your account/my page.
Contact your home country carrier for support
If your eSIM settings are correct but your SIM still won’t connect even after restarting your phone or reinserting the SIM, there may be a contract-related issue with your carrier.
It’s recommended to contact the customer support or visit a store of your home country mobile carrier for assistance.
FAQ: Japan eSIM After Returning Home

Here we answer common questions about how to delete eSIM from iPhone, how to remove eSIM from iPhone, and what to do with your Japan travel eSIM after returning home.
Please refer to this if the article didn’t resolve your issue.
What happens if I delete my Japan eSIM?
When you delete or remove your Japan travel eSIM, the eSIM profile is erased from your device.
This disconnects your phone from the carrier’s network, meaning you can no longer make calls or use mobile data. Be careful not to delete the eSIM during your trip.
Can I reinstall the Japan travel eSIM?
In most cases, prepaid eSIMs cannot be reinstalled once deleted.Be careful not to delete or remove your Japan travel eSIM while it is still in use.
If you accidentally delete it, it is best to contact the eSIM provider for support.
Why can’t I make calls after returning home?
If you cannot make calls after your trip, it is likely that the Japan travel eSIM is still active or your phone has not switched back to your regular SIM.
Check the voice call settings in your SIM management screen to ensure your home-country SIM is selected.
This issue is a common case of SIM not working after returning from Japan trip, and adjusting the settings usually resolves it.
Summary
This article explained how to delete eSIM from iPhone, how to remove eSIM from iPhone, and how to delete or remove eSIM on Android after returning from Japan.
We also showed how to switch back to your home-country SIM and what happens if you delete your Japan travel eSIM after returning home.
For more tips on using Japan travel eSIMs with both iPhone and Android, check out our other guides before your next trip.
