In recent years, awareness of eSIM has grown rapidly, and eSIM services for international travel have become increasingly popular.
If you are reading this, you may be considering how to use eSIM for Japan travel, or perhaps you have already purchased an eSIM data plan.
This time, we will explain how to use eSIM for Japan, including the right timing for switching, setup methods, and important tips!
Koki Abe
eSIM Portal Administrator
Contents
- 1 How to Use eSIM for Japan Travel: Switching Methods and Timing
- 1.1 Best Timing to Switch to Your Japan eSIM
- 1.2 STEP 1 | Install (Activate) Your eSIM in Your Home Country
- 1.3 STEP 2 | Turn ON Airplane Mode During the Flight & Turn OFF Mobile Data on Your Regular SIM
- 1.4 STEP3 | Turn On Mobile Data Upon Arriving at a Japanese Airport
- 1.5 Turn ON Data Roaming Depending on Your eSIM Plan
- 2 What is eSIM? An Embedded SIM Explained
- 3 Benefits of Using an eSIM for Japan Travel
- 4 FAQs
- 4.1 What if I Accidentally Turn ON Mobile Data for My Japan eSIM While Still in My Home Country?
- 4.2 Error: “Unable to Add Mobile Data Plan from This Carrier”
- 4.3 This eSIM Cannot Be Added (This Code Is No Longer Valid)
- 4.4 Does the Method of Adding an eSIM Differ Depending on the iOS Version?
- 4.5 What Should I Do If My APN Settings Might Be Incorrect?
- 4.6 What Should I Do with My eSIM Settings After Returning Home?
- 5 Conclusion
How to Use eSIM for Japan Travel: Switching Methods and Timing
Let’s get started by explaining the eSIM switching process when traveling to Japan, from your home country to the airport in Japan.
To help you understand clearly, we will show the step-by-step flow with illustrations so you know the best timing for switching your eSIM during your trip.
Best Timing to Switch to Your Japan eSIM
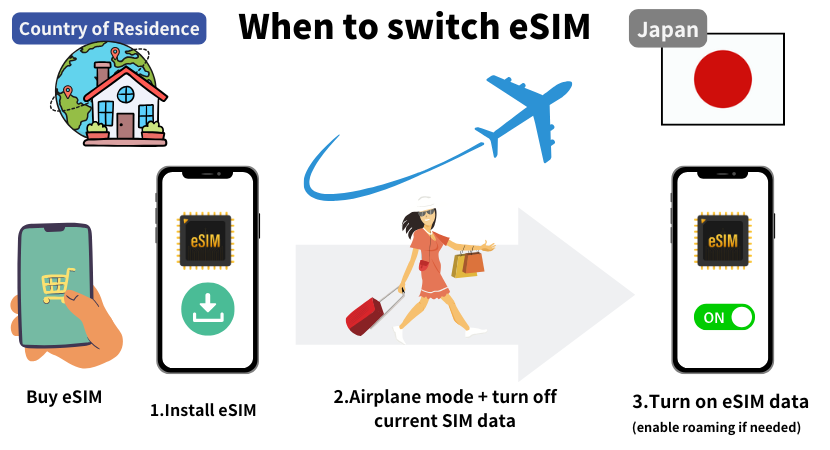
The timing for switching to your eSIM for Japan travel follows these steps:
eSIM Switching Timing for Japan Travel
- 【While in your home country】Install (activate) the purchased eSIM for Japan travel
- 【At your home country’s airport】Switch your phone to Airplane Mode and turn off mobile data on your regular SIM
- 【In Japan】Turn ON mobile data for your Japan eSIM (enable data roaming if necessary)
Let’s go through each step in detail.
STEP 1 | Install (Activate) Your eSIM in Your Home Country
First, install (activate) the eSIM you purchased for Japan travel while you are still in your home country. There are three main methods of eSIM installation:
| Advantages | Disadvantages | |
| Install via QR Code | Quick and simple installation | Requires showing the QR code on another device or printing it in advance |
| Install via Activation Code | Can be completed entirely on a single smartphone | Copying and pasting the code can be a little inconvenient |
| Install Directly from an App | Fast and convenient setup | Only supported by certain eSIM providers (e.g., Airalo, Soracom Mobile) |
For each installation method, refer to the official website or the tutorials provided by the carrier’s dedicated app.
Always install your eSIM in a stable internet environment (a Wi-Fi connection is strongly recommended).
Below, we will explain how to install your eSIM for Japan using a QR code.
Install eSIM with a QR Code Using Two Smartphones | iOS Method
 |
| Go to Settings → Mobile Service and tap Add eSIM. |
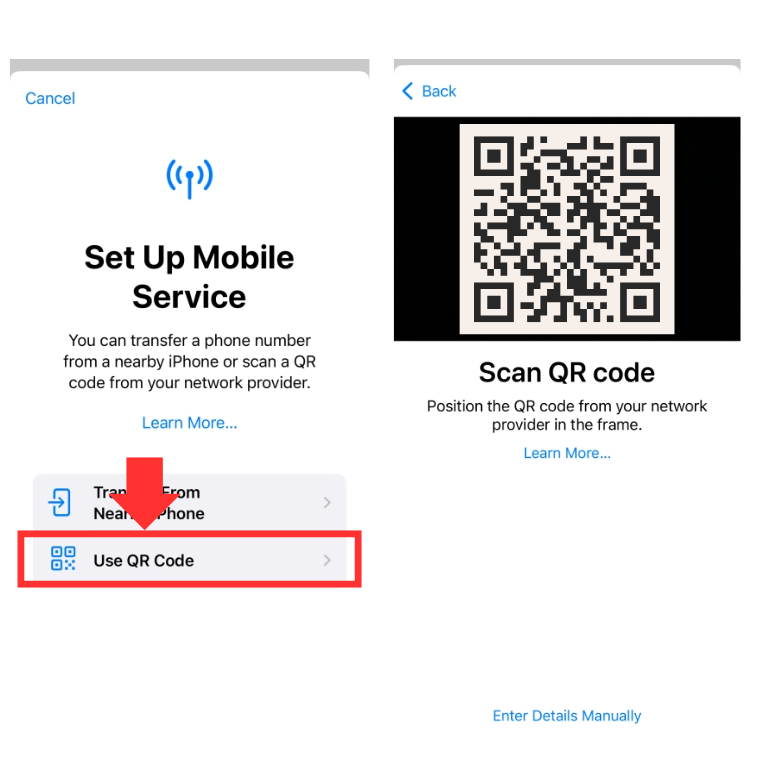 |
| Select Use QR Code and scan the QR code displayed on your other device. Scan the QR code displayed on the other device with your iPhone. |
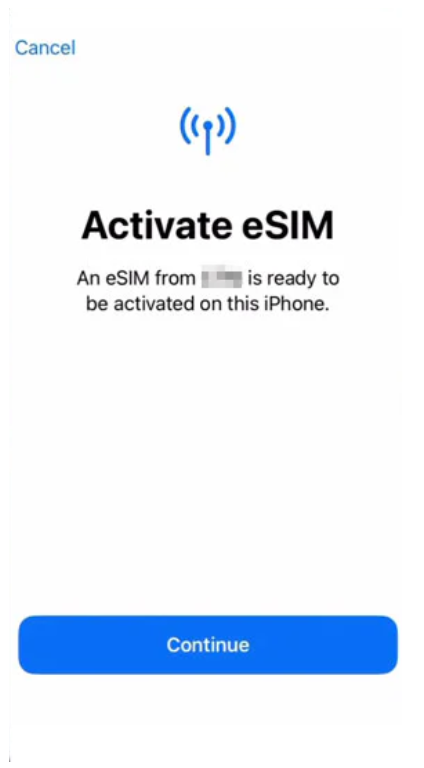 |
| Once activation is complete, your screen will show “Mobile Data Setup Complete.” |
*Note: The exact steps for installing an eSIM with a QR code may vary depending on your iOS version. For more details, please check the FAQ section in this article.*
STEP 2 | Turn ON Airplane Mode During the Flight & Turn OFF Mobile Data on Your Regular SIM
When departing from your home country’s airport, make sure to switch your smartphone to Airplane Mode. This is required by aviation law (Article 164) for carrying electronic devices on board.
Follow these steps to enable Airplane Mode:
 |
| From the Settings app, toggle the switch to turn ON Airplane Mode. (The example above shows iPhone, but the steps are almost the same on Android.) |
Next, when you arrive in Japan, turn OFF mobile data (data roaming) on your home-country SIM.
If data roaming remains ON, you may be charged expensive international roaming fees. To avoid this, make sure to disable mobile data before landing in Japan.
Here is how to turn off mobile data step by step.
How to Turn Off Mobile Data on iPhone
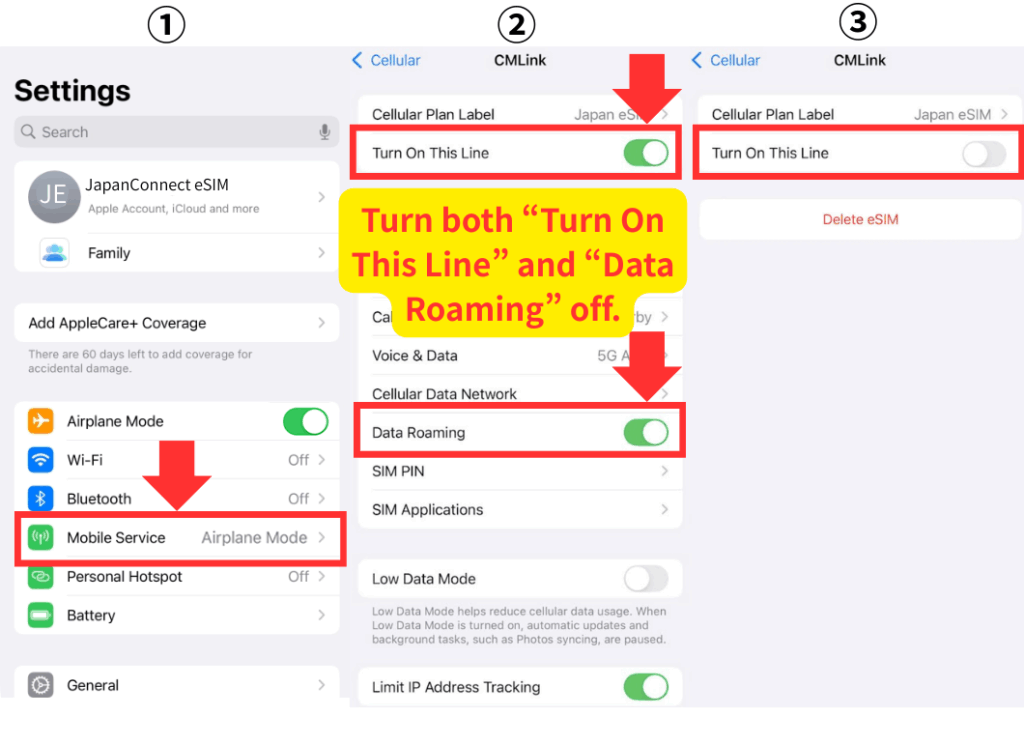 |
| From Settings, go to Cellular → select your home-country line and switch Turn On This Line to Off. Also, make sure to set Data Roaming to Off. |
How to Turn Off Mobile Data on Android
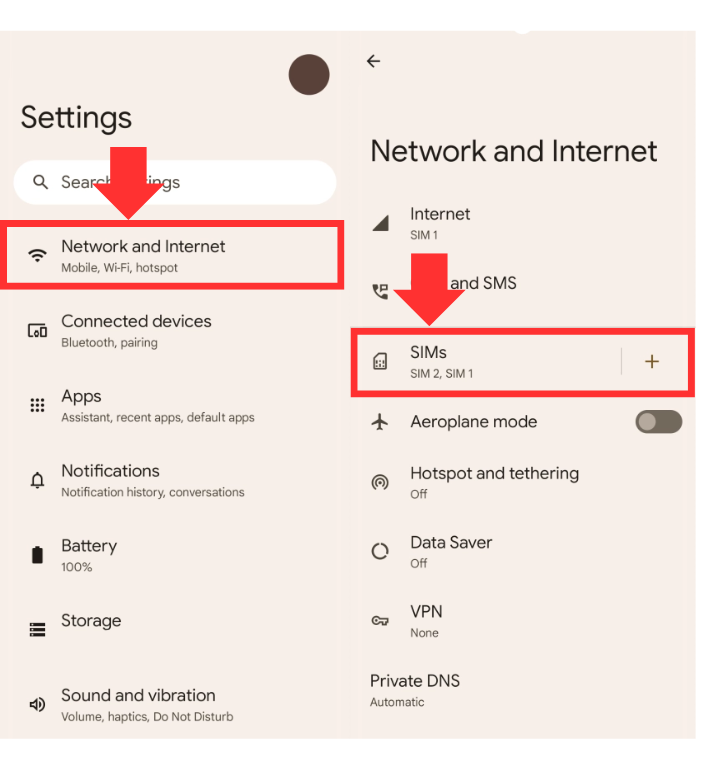 |
| From Settings, go to Network & Internet → SIM. |
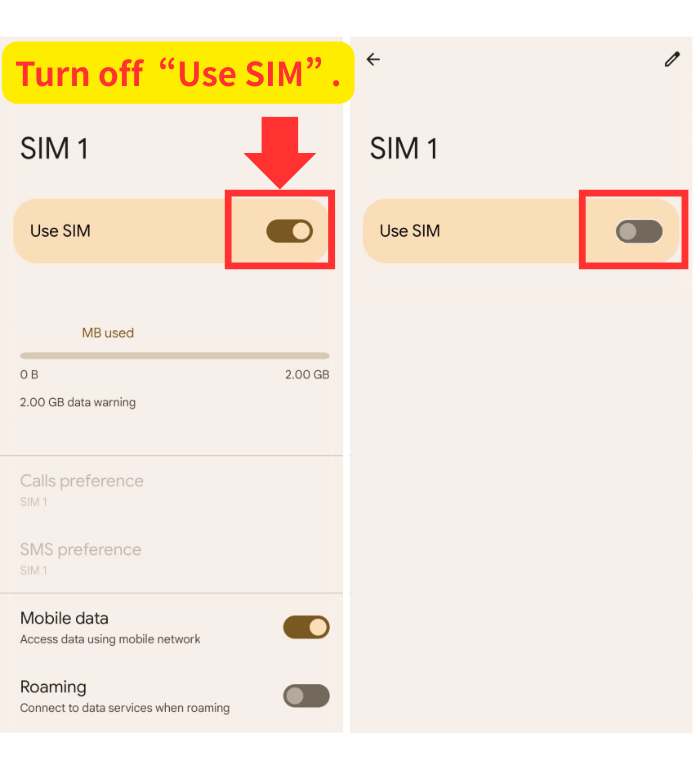 |
| Switch Use SIM to Off. |
STEP3 | Turn On Mobile Data Upon Arriving at a Japanese Airport
Once you arrive at a Japanese airport, connect to the internet using your Japan travel eSIM. Follow the steps below to turn on mobile data for your eSIM.
How to Turn On eSIM Mobile Data on iPhone
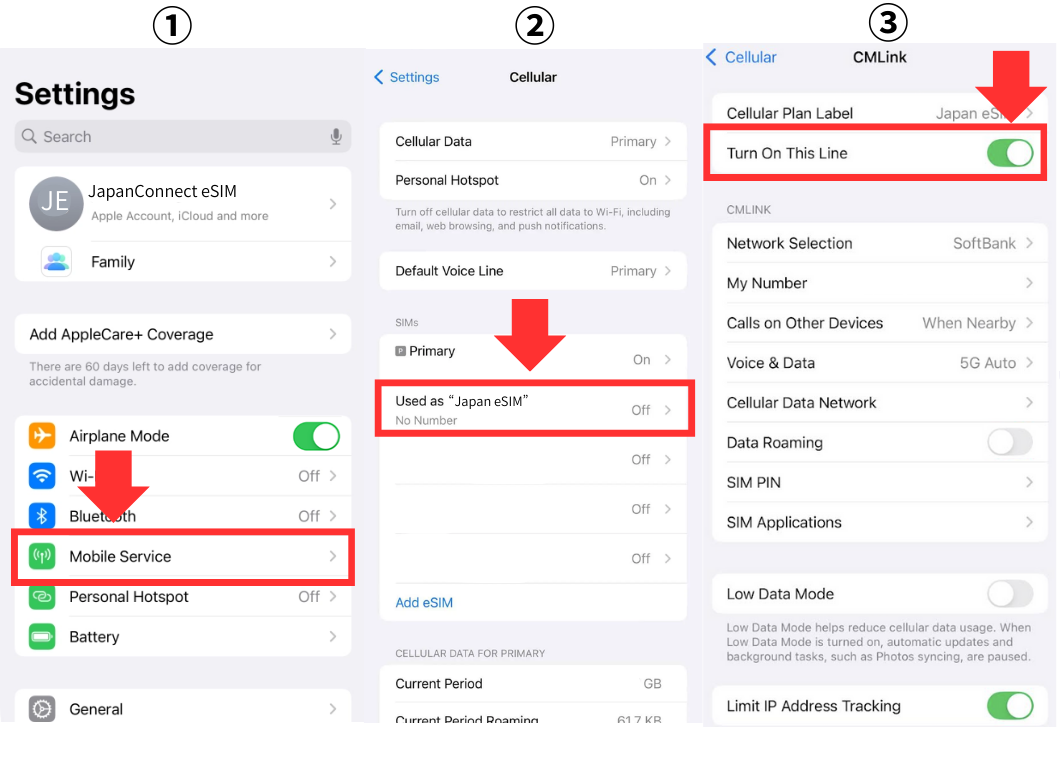 |
| Go to Mobile Service → select your Travel eSIM → toggle “Turn On This Line” to ON. |
How to Turn On eSIM Mobile Data on Android
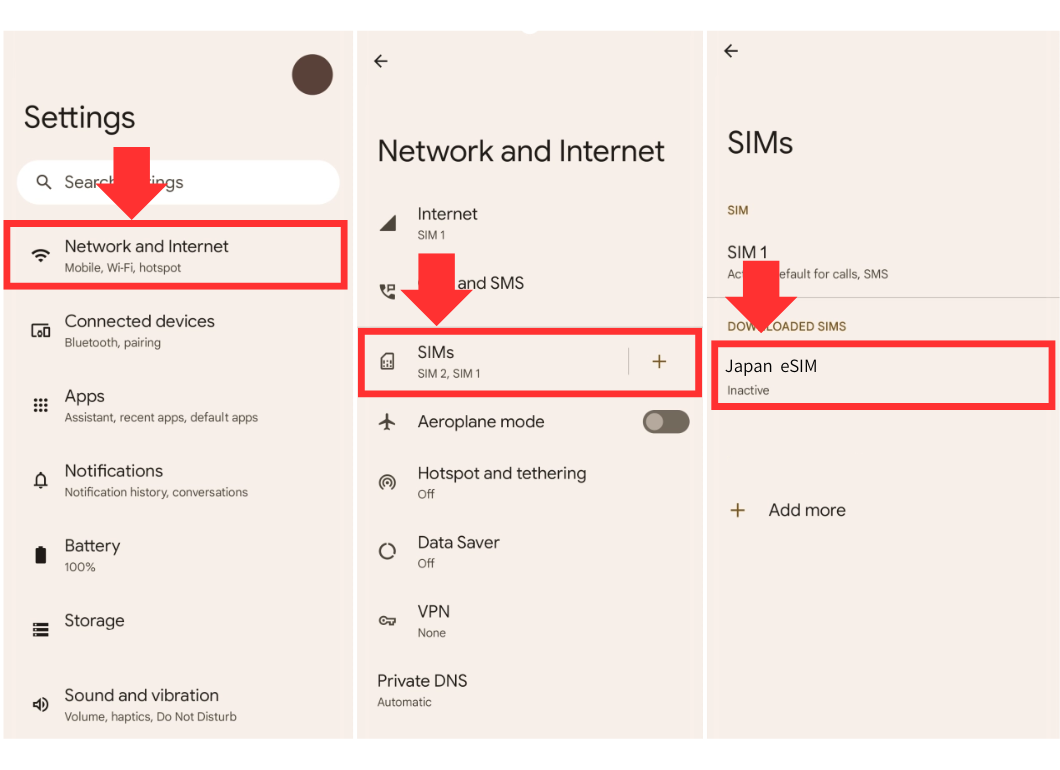 |
| Go to Network and Internet → SIMs → select your Japan eSIM (in this example, Japan eSIM). |
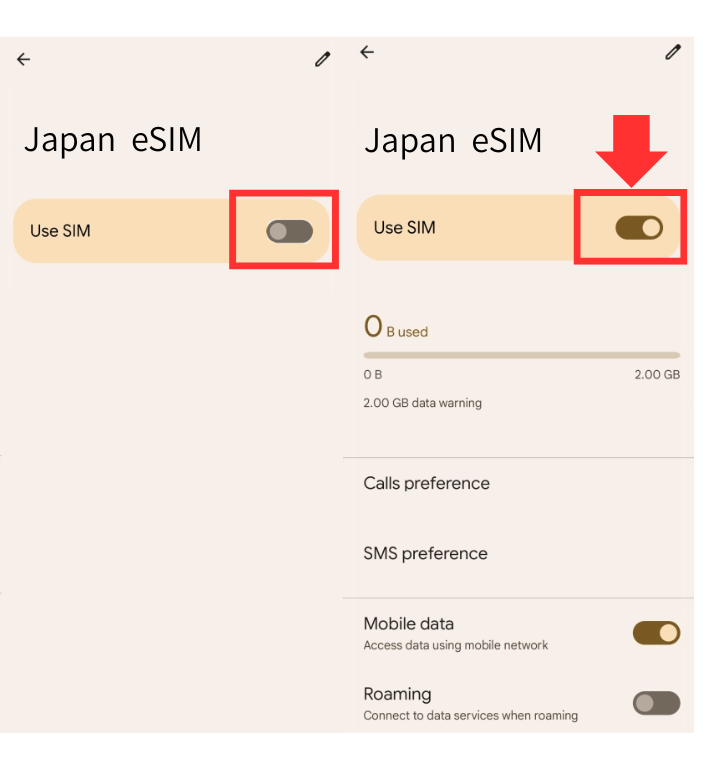 |
| Check Use SIM to confirm that mobile data is ON. |
Turn ON Data Roaming Depending on Your eSIM Plan
If your eSIM data plan specifies in the application page or on the voucher (the email you receive with the eSIM QR code after purchase) that “Data Roaming must be turned ON”, then you need to enable Data Roaming.
Follow the steps below to turn ON Data Roaming.
How to Turn ON eSIM Data Roaming on iPhone
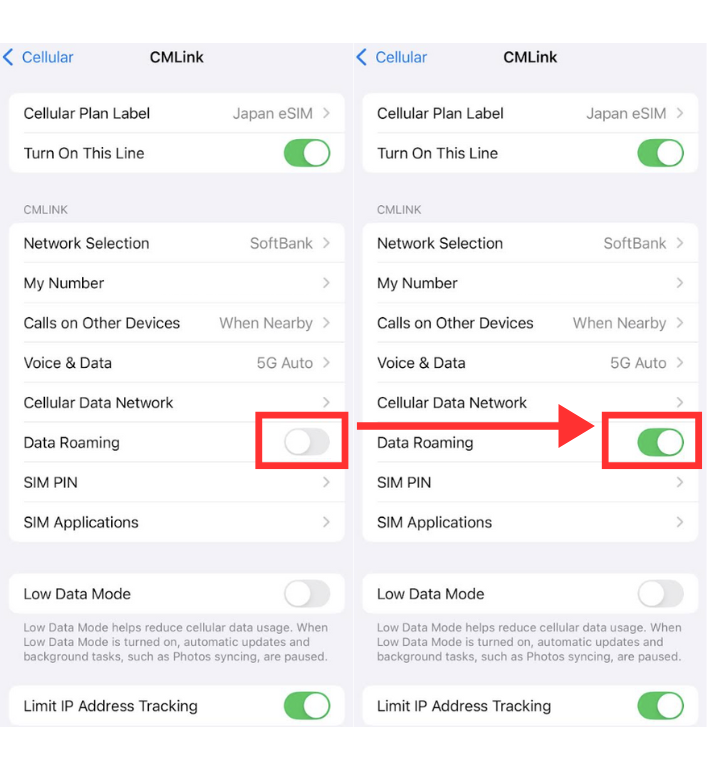 |
| On the same settings screen where you turned ON mobile data for your eSIM, switch Data Roaming to ON. |
How to Turn ON eSIM Data Roaming on Android
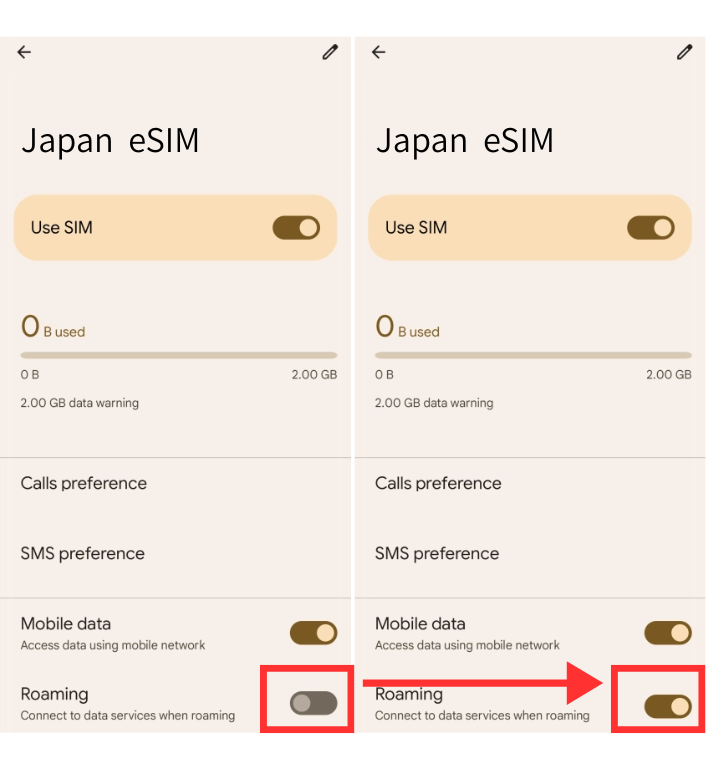 |
| On the same settings screen where you turned ON mobile data for your eSIM, switch Roaming to ON. |
APN Settings May Also Be Required
Depending on the eSIM data plan, APN settings※ may be applied automatically or require manual configuration. If manual APN settings are needed, instructions will be included in the purchase notes or voucher, so please check when purchasing. For details on APN settings, please consult the official website of each eSIM service.
※APN Settings…Initial setup required to connect your smartphone to the internet
What is eSIM? An Embedded SIM Explained
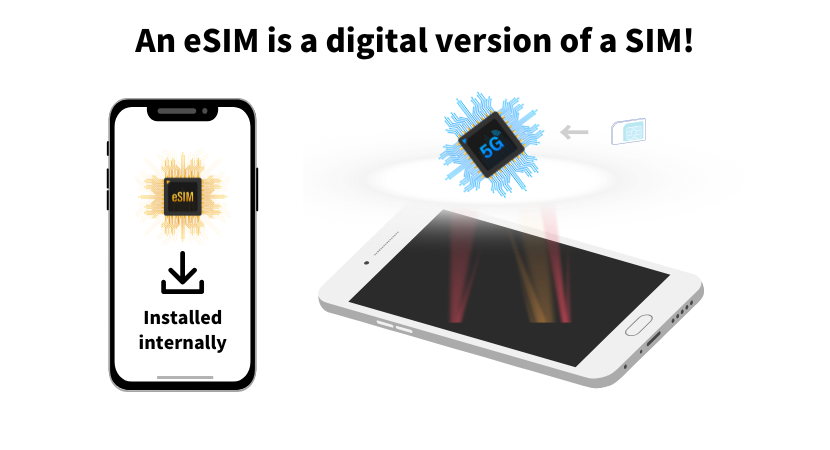
eSIM (embedded SIM) stands for an embedded SIM card.
Unlike the traditional physical SIM card that you insert into your smartphone, an eSIM is a digital SIM that stores all the information needed for mobile connectivity.
In other words, you don’t need to insert a card. Instead, the eSIM is built into your smartphone and activated digitally by the user. This makes how to use eSIM simple, flexible, and convenient for both domestic use and international travel.
A Smartphone Compatible with eSIM is Required
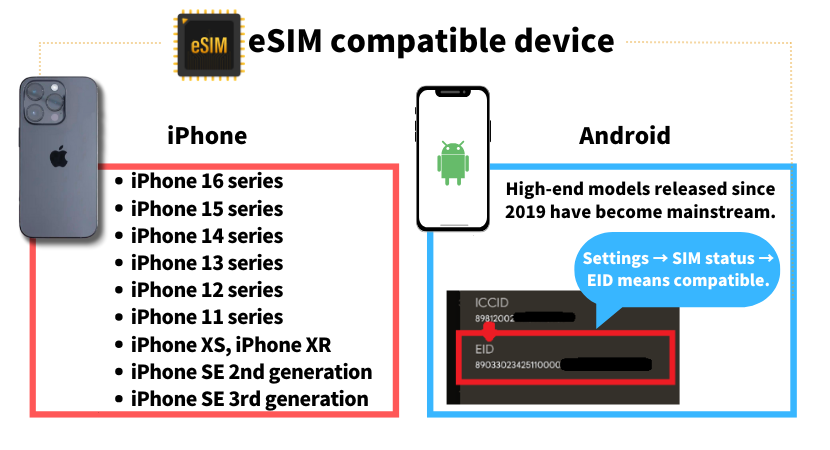
To connect your smartphone to the internet using eSIM, you must first confirm that your device is eSIM-compatible.
In addition, your smartphone must be unlocked (SIM-free)※ in order to use an eSIM.
Unlocked Smartphones
SIM lock is a restriction set by mobile carriers to prevent the use of SIM cards (including eSIMs) from other providers. A smartphone that has had its SIM lock removed is commonly called a SIM-free device. If your phone is locked, you will need to complete the SIM unlock procedure with your carrier before using an eSIM.
If you want to check whether your smartphone supports eSIM, use the following method.
How to Check if Your iPhone Supports eSIM
 |
| Open the Settings app → “General” → “About” → “EID”. If a 32-digit eSIM identification number is displayed, your iPhone supports eSIM. |
The iPhone 15 sold in the U.S. is already eSIM-only and does not have a SIM slot. It is highly likely that future iPhone models worldwide will all support eSIM.
However, iPhones sold in China do not support eSIM for any model series.
How to Check if Your Android Device Supports eSIM
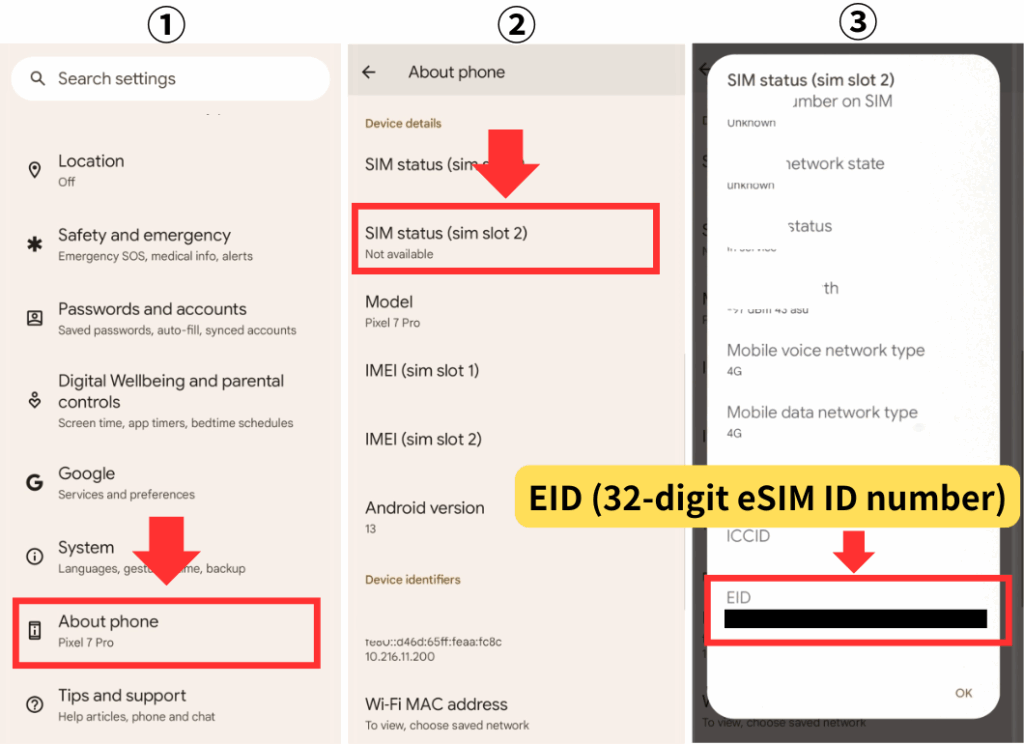 |
| The example above shows a Pixel 7pro. Go to “About Phone” → “SIM Status” → “EID”. If a 32-digit eSIM identification number appears, your Android device supports eSIM. |
Benefits of Using an eSIM for Japan Travel

There are three main benefits of using an eSIM when traveling in Japan. Compared to rental Wi-Fi or a traditional physical SIM card, eSIM offers clear advantages.
Key Benefits of eSIM
- Fast activation with minimal setup
- No extra device to carry and no risk of losing a SIM card
- Easily switch between multiple eSIM plans
Let’s go through these advantages one by one.
Faster Activation Compared to Other Options
eSIM services for Japan travel can be purchased directly through a website or a dedicated mobile app. The entire process is contactless, allowing you to complete everything from purchase to setup on your own without meeting anyone.
This means you save time compared to searching for a SIM counter or arranging rental Wi-Fi, making eSIM activation significantly faster.
The time from purchasing to activating an eSIM can take as little as 5 to 10 minutes.
No Extra Device to Carry and No Risk of Losing It
Because an eSIM is installed directly inside your smartphone, there’s no need to insert or swap a physical SIM card.
Unlike rental Wi-Fi, it doesn’t add bulk to your luggage, and there’s no risk of losing a separate device or SIM card.
Ability to Switch Between Multiple eSIMs
With eSIM, you can keep your regular SIM card active while adding multiple eSIM profiles, limited only by your device’s memory.
If you purchase and install eSIMs for multiple countries in advance, you can simply switch between them as you travel from country to country and stay connected instantly.
This is especially convenient for international travelers visiting Japan and other destinations, as you no longer need to buy a new SIM card every time you land in a new country.
FAQs
Here are some frequently asked questions about how to use an eSIM in Japan and how to switch between eSIM plans.
If you still have questions after reading this article or cannot connect to the internet, please check the FAQs below.
FAQs About Using eSIM in Japan
- What happens if I accidentally turn ON mobile data for my Japan eSIM while still in my home country?
- Error: “Unable to Add Mobile Data Plan from This Carrier”
- Error: “This eSIM Cannot Be Added (This Code Is No Longer Valid)”
- Does the eSIM installation process differ depending on the iOS version?
- How do I set the APN for my eSIM?
- What should I do with my eSIM settings after returning from Japan?
What if I Accidentally Turn ON Mobile Data for My Japan eSIM While Still in My Home Country?
If your eSIM data plan does not include your home country (i.e., it is not a regional or global roaming plan), there is no issue even if you accidentally switch ON mobile data for your Japan eSIM while abroad.
However, to be safe, it is recommended to keep the Japan eSIM’s mobile data switched OFF until you arrive in Japan.
Error: “Unable to Add Mobile Data Plan from This Carrier”
If you see the message “Unable to Add Mobile Data Plan from This Carrier”, it is possible that your device is locked to a specific carrier (SIM-locked).
In this case, contact the carrier from which you purchased your smartphone and request a SIM unlock procedure. An unlocked (SIM-free) device is required to use an eSIM in Japan.
This eSIM Cannot Be Added (This Code Is No Longer Valid)
If you see the message “This eSIM cannot be added (This code is no longer valid)”, it means that the eSIM code has already been activated.
Remember, an eSIM QR code can only be used once. Check the following three possible reasons:
When Your eSIM Code Is No Longer Valid
- Check your mobile data settings to see if an eSIM plan was already activated with the same QR code.
- You may have started the activation process with the QR code and then canceled it.
- The same eSIM data plan may already be in use on another device.
If none of these apply and the issue persists, contact the eSIM provider from whom you purchased the plan for further assistance.
Does the Method of Adding an eSIM Differ Depending on the iOS Version?
Yes, the process of adding an eSIM can vary depending on your iOS version.
How to Add an eSIM on Different iOS Versions
- iOS 16 and earlier: You can add an eSIM by scanning a QR code from another device or a printed copy via Settings → Cellular.
- iOS 17.4: You can scan a QR code saved as an image directly from Settings → Cellular.
- iOS 18 and later: Apple removed the “Scan from Photos” option. Instead, you can long-press a QR code displayed on the screen, and an Add eSIM option will appear. ※ Note: Some eSIM providers may not support the long-press method, so the iOS 16 method may still be required.
What Should I Do If My APN Settings Might Be Incorrect?
APN settings vary depending on your eSIM provider and travel destination.
If you suspect that your APN settings are incorrect, check the help pages provided by your eSIM provider. Below are the links for reference:
◆ APN setup guides for major eSIM services
・Airalo: Help Page
・Holafly: FAQ
What Should I Do with My eSIM Settings After Returning Home?
After returning from Japan, turn OFF data roaming for your Japan travel eSIM and turn ON mobile data for your home-country SIM.
If the Japan eSIM has expired, you should delete it from your device.
Conclusion
Key Takeaways from This Article
In this article, we explained how to use an eSIM in Japan and when to switch to your Japan eSIM for the smoothest experience.
Make sure to remember the steps and timing for switching your eSIM so you can enjoy fast and reliable internet during your trip to Japan.
